|
I can’t believe it’s the last day! It’s been so much fun this week sharing all of the homes this week. I did want to tell you that there were some technical difficulties. WordPress was having a caching issue. and even when people fixed their posts, and updated links, it wasn’t showing, which I know made navigating the tour a little harder. Hopefully today will be much smoother, and we can enjoy the day tech-issue free for the Holiday Housewalk 2018 Day 5! Fingers Crossed! And did you know Monday is my Holiday Housewalk Linky party? You can join in with your own home tour, and when I have a spot open up, it’s one of the first places I pull from! If you only have an IG account, you can use the hashtag #JRholidayhousewalk2018, so I can find your home! Make sure to stop by Monday to grab the button and find out the guidelines. If you missed the first day, and want to take the tour from the beginning, start here.
We’ll kick the day off today with Michael’s new home! I love seeing all of the changes he’s made! He has such a great eye!
Thank you so much for joining us for another amazing Holiday Housewalk 2018 Day 5 ! I am so grateful to all of the bloggers, all week,who opened up their homes, and shared their creativity with us! I hope you enjoyed the walk! You can see Day 2 here Love reading Christmas books? Check out my book on Amazon (affiliate link)!
The post Jennifer Rizzo’s Holiday Housewalk 2018 Day 5! appeared first on Jennifer Rizzo. from https://jenniferrizzo.com/2018/11/jennifer-rizzos-holiday-housewalk-2018-day-5.html
0 Comments
Welcome to the Holiday Housewalk 2018 Day 4! It’s been such an amazing week so far, and I’ve loved looking at, and sharing all of the beautifully decorated homes for the holidays!
If you missed the start of the awesome home tours, and want more holidays decorating inspiration, you can see Day 1 here. or (affiliate link) My Christmas Decorating Book Let’s start today’s tour with someone who’s home I not only love, but I adore how her style has changed and evolved over time!
Thank you for joining us for such an amazing day of home tours! We’ll see you tomorrow for the last day as we start with:
The post Welcome to Jennifer Rizzo’s Holiday Housewalk 2018 Day 4! appeared first on Jennifer Rizzo. from https://jenniferrizzo.com/2018/11/welcome-to-jennifer-rizzos-holiday-housewalk-2018-day-4.html I can’t believe it’s already the 2018 Holiday Housewalk Day 3! This week ,full of Christmas home tours, has been flying by. The thing I really love is how everyone’s personal style just shines through, and there are so many unique and creative ideas! When you talk about bringing Christmas, these guys have brought it! It makes me excited to see what the next house brings, and look forward to the next week of home tours!
If you missed day 1, you can see it here You can catch up on day 2 here. Today starts off with the beautiful,and festive home of:
I hope you have enjoyed all of the homes today! Want more home tours? Visit the 2013 housewalk, and stop back tomorrow to start the day off with:
The post Welcome to Jennifer Rizzo’s 2018 Holiday Housewalk Day 3 appeared first on Jennifer Rizzo. from https://jenniferrizzo.com/2018/11/welcome-to-jennifer-rizzos-2018-holiday-housewalk-day-3.html I am so excited to be back for another day of holiday home tours on the 2018 Holiday Housewalk Day 2! If you missed yesterday, you can start the walk here. We had 8 amazing homes yesterday in honor of going into our 8th year running! I know you are going to love the homes we have featured today, and I love sharing all of these holiday home tours with you! I’ve already put Pinterest into working over time with all of the amazing holiday decorating ideas! Let’s start today with the home of:
I hope you loved all of the homes on today’s house walk! I can’t wait until tomorrow when we start with:
And, if you love Christmas decorating,make sure to check out my (affiliate link) crafting and decorating book, Creatively Christmas
The post Welcome to Jennifer Rizzo’s 2018 Holiday Housewalk Day 2!!! appeared first on Jennifer Rizzo. from https://jenniferrizzo.com/2018/11/welcome-to-jennifer-rizzos-2018-holiday-housewalk-day-2.html Welcome! I am so excited to have you all here for the Holiday Housewalk 2018 Day 1!This is the 8th year running! Who would have thought when I got a group of friends together for the first housewalk, that here we would be, still fa-la-la-ing along. I am so glad for it, and honored that you still look forward to it as much as I do! It’s my favorite time of the year! We have some old favorites, and some brand new homes this year, including our winner of the linky party! Make sure you link up your holiday home next Monday to enter for your spot to be on the housewalk next year!
In honor of our 8th year, for the first day,we are going to have 8 amazing homes! So, grab your hot cocoa, a few cookies (we won’t tell), and crank up the holiday tunes! Let’s start the Holiday Housewalk 2018 Day 1!Just click on either the picture, or the linked text to get started!
I hope you loved these awesome homes for the kick off of the Holiday Housewalk 2018 ! Join us tomorrow as we start day 2 of the Holiday Housewalk with:
And if you love Christmas, make sure to check out my holiday decorating, and crafting book on Amazon (affiliate link) The post Welcome to Jennifer Rizzo’s Holiday Housewalk 2018 Day 1 appeared first on Jennifer Rizzo. from https://jenniferrizzo.com/2018/11/welcome-to-jennifer-rizzos-holiday-housewalk-2018-day-1.html Welcome to my holiday home tour 2018! I am so excited to have you here, and be the first house on the house walk!
We remodeled our kitchen, doing a lot of the work ourselves, 10 years ago, for about $12,000. Our rehab included painting our old oak cabinets, and adding a wood counter top, which has actually held up fairly well 8 years later. I decided to go with a lot of natural decor and greenery this year. I may have to replace the greenery in a week or two, it depends on how fast it dries out and gets crunchy. Next week, I’ll show you how I made the boxwood swag over the basement door. I just clipped branches from our yard. I hung a pretty mercury glass ornament wreath over it. (this post may contain affiliate links)
Very recently, I realized we needed a smaller island, and found this vintage sewing cabinet on Craigslist. It’s the perfect size for our cozy kitchen. We had a chandelier problem earlier this year, and finally fixed it by moving the old lighting from our dining room into the kitchen, and getting new lighting for our dining area. That space is getting a complete makeover, I can’t wait to show you, but here’s a sneak peek picture:
I love adding some holiday cheer to our counter tops, but our kitchen window is my favorite place to decorate.
I love that we have a window over our sink. It makes the kitchen seem so bright, especially during the winter.
I added some cedar garland, wood beaded garland, and mercury glass ornaments to bring in some greenery. I have a few permanent white hooks in place, so I can hang various things in the window through the year.
I brought some little green mini-trees from the shop, and scattered some ornaments on the sill for brightness.
I also added some wood bead garland to the chandelier we moved. I might leave it there past the holidays.
In the living room, I also kept with a boho meets natural decor theme. I still love this rustic modern mantel I did a few years ago with the same deer.
The rug has so much color, it’s nice keep everything else fairly neutral. I loved being able to paint a picture as a backdrop for the reindeer this year on the mantel. We had a mirror up there forever, and I thought it was time for a change. A few faux eucalyptus sprays, and mercury glass trees made the scene complete.
Our tree has the option of white or multi-colored lights. I love the white lights, but the kids like to switch it to the multi-colored when I’m not looking.
A boxwood wreath, with a few vases with seeded eucalyptus stems are a perfect, and easy centerpiece. Of course, I use my Christmas crafting/decorating book as a holiday decor item as well!
Thank you so much for joining my holiday home tour 2018 as the first house on the holiday housewalk! Please make sure to stop back every day this week to see all of the gorgeous homes! And next Monday, join the linky party to be entered for a chance to be on the housewalk next year! Now, onto the next beautiful house:
Need more holiday inspiration? Visit last year’s housewalk here. The post My Holiday Home Tour 2018 appeared first on Jennifer Rizzo. from https://jenniferrizzo.com/2018/11/my-holiday-home-tour-2018.html You guys know I love my steam cleaner! I use it all of the time. It was one of those things I didn’t know I needed until I had it! I recently had to steam clean a vinyl floor at work. I might had dropped an an entire container of paint on myself, and the surrounding area ( Ok, maybe two containers of paint, a few days in a row.). And then, we had a workshop where there was blue paint on the floor. So let’s just say, there was a big clean up in order. The thing about a Makery, is that there is always paint being used. Most of the time, I just get it on myself.
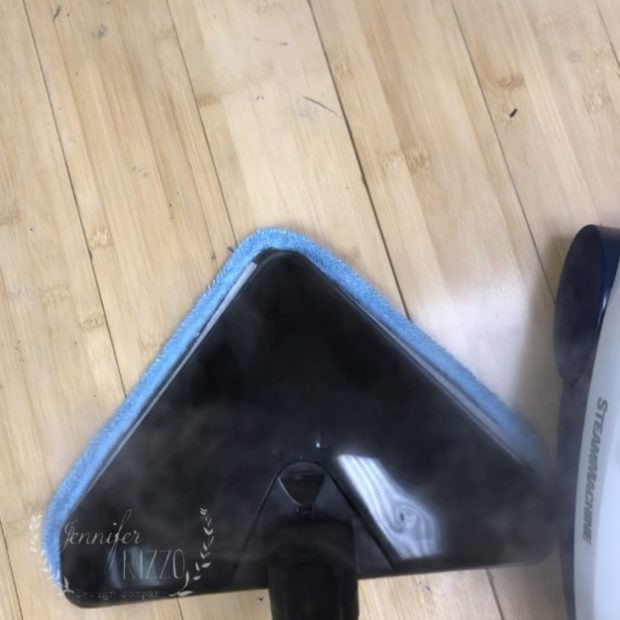
(This post contains affiliate links) While I am not excited that I ruined a perfectly good pair of shoes, and socks, and leggings…I am excited to share the new HomeRight SteamMachine Elite with you. With it’s triangular head attachment, and microfiber pad, it made taking the paint off the floor super easy, and much less back-breaking!
I was amazed at how well it cleaned the paint up! You can see more about how I cleaned it here on the HomeRight blog, plus some of my other HomeRight projects.
It quickly softened the paint, and then started to lift it right up! It was so much easier than getting on my hands and knees to scrub it.
You guys, I was seriously impressed. I couldn’t believe how clean the floor ended up! I’m going to tackle the ceramic floor in our basement next. The thing I really love about the HomeRight SteamMachine Elite, is that it comes with 19 attachments, including one for regular fabric steaming! I have some gray linen drapes to try it on, so I will let you know how it works!
This is a sponsored post by HomeRight. Opinions are entirely my own. This post does not substitute for the the proper operating instructions. Always read them thoroughly before using the steam cleaner. The post Steam Clean a Vinyl Floor appeared first on Jennifer Rizzo. from https://jenniferrizzo.com/2018/11/steam-clean-a-vinyl-floor.html I’m excited to share my winter wonderland, woodland fireplace mantel and tree,with a winter night painted canvas decor to share with you! But first, can you believe it’s almost December??? My annual Holiday Housewalk is almost here, and Christmas is right around the corner. The time has flown by. Of course, since I live in retailland, we’ve actually been doing the holiday thing since our first shipment came in August. At least now, I can actually put up some of my own Christmas decorating, and my neighbors won’t think the cheese has completely slid off my cracker!
I’m joining my friends from the Season’s of Home holiday series again to share our holiday decor with you. I put my woodland-themed tree up again this year, since I loved it so much last year, and I incorporated my deer from my rustic mantel a few years ago. This year, instead of the old mirror I had up there, I’ve been changing out my art, and decided to make Winter Night Painted Canvas decor this year. I loved the idea of the deer hanging out under the stars and the moon.
I added some mercury glass trees from Homegoods to my mantel, and that cute tree is a live tree! It’s called a Norfolk Pine. I picked it up from the grocery store for about $24! I thought it was such a great touch of live green to my decor. I love using live greenery, like last year when I went a little Scandinavian, and put these live trees on my mantel in water. I painted the large canvas in DecoArt’s chalky finish paint, and used white paint to make the tree images, as a winter wonderland back drop for my deer.
The deer are also hanging out with some faux eucalyptus, and a fun felted garland from Anthropologie I bought a few years ago.
My tree is just a plain, green tree from Balsam Hill that I tuck snowy branches into. It makes it look like a flocked tree with out the expense.
I’ve kept the other side of the room simple, with a few sprigs of fresh Eucalyptus,in pretty white vases.
If you love holiday crafting and decorating, make sure to check out my Christmas book on Amazon (Affiliate link) And make sure you visit the other bloggers, and see their fun, and festive decorating too!
Ella Claire | Nina Hendrick Design Co. | Zevy Joy | Beneath My Heart
Boxwood Avenue | Craftberry Bush | Inspired by Charm | Home Stories A to Z
French Country Cottage | Rooms for Rent | City Farmhouse | Nesting with Grace
Thistlewood Farms | Jennifer Rizzo | Dear Lillie | Love Grows Wild The post Woodland Fireplace Mantel and A Winter Night Painted Canvas decor appeared first on Jennifer Rizzo. from https://jenniferrizzo.com/2018/11/woodland-fireplace-mantel-and-winter-night-painted-canvas.html the ombre trend has been around for a year or two in hair and clothing, and lately, I’ve noticed it has started to creep into home decor. I’ve seen metallic ombre glass on light fixtures, and other decor such as vases. I really love how the tones change when the light glows through it, and I though it would be pretty to use metallic paint to make my own metallic ombre glass globe.
Making this ombre metallic globe is an easy, and pretty project.I used DecoArt’s Metallic paints, and foam brushes to create my ombre effect. Once I had the technique down, it was really easy to paint. This would be really pretty on ornaments too… If you are looking for a few ornament projects, you can try this gold leaf ornament, or these botanical-inspired ornaments. You’ll need: Metallic multi-purpose paint in a copper/bronze tone, a dark gold metallic paint, and a silver or pewter paint. a foam brush for each color of metallic paint Start by cleaning the globe to remove any finger oils, or reside that might make it harder for the paint to stick.
Once you glass is dry, paint a multi-purpose paint in a brown tone as a base. Let dry completely.
Using a foam brush, lighting dab Antique Bronze paint on the base just over 1 /3 of the way up.
While it’s still wet, paint a think band with your second color (gold), and then use the still wet brush from your bottom color to blend the two together where they meet.
Repeat with the third color, continuing to blend the colors at the edges.
You’ll get a slight orange peel texture as the paint dries, but that gives it a hammered metallic look.
Let dry completely, if the paint isn’t cured, it’s more likely to scratch and chip. Adding a sealer like craft polyurethane will also minimize any scratching from use.
Once the paint is completely dry, adding a battery-operated candle inside, or fairy lights creates a pretty glow.
This post is sponsored by DecoArt, opinions are entirely my own. Always be careful when working with, and painting on glass. Love this project? Check out these fun and easy glitter ornaments with metallic paint.
The post DIY Metallic Ombre Glass Globe appeared first on Jennifer Rizzo. from https://jenniferrizzo.com/2018/11/diy-metallic-ombre-glass-globe.html We very recently had a Christmas Tree Farm Holiday Sign Workshop at The Collective lhe in the Makery. It was so much fun, and everyone did such an amazing job with their signs! Like many of our workshops, we provide the artwork, supplies, and direction! We do the hard part, so that the attendees can do the fun part! I thought I would share a bit of the workshop with you.
(this post may contain affiliate links)
I love leading/teaching creative classes, and we had such a great time in our workshop. The participants had the option of an unframed, or framed custom boards,ready to paint. We had moms and daughters come together, sisters, and even best friends that came together to create in community. After everyone laid out their artwork, they transferred it, and then they were able to get to the fun part! I was excited to see how their Christmas Tree Farm Sign Workshop was going to turn out!
Even though it’s only the beginning of November, we cranked the holiday tunes and they painted away!
I love how everyone starts with the same artwork, but every piece turns out so differently, but adding little custom bits . We also had the option for everyone to personalize their signs. Some people chose their last name, and other’s made it a little more informal.
As well as custom artwork, we used some of the stencils from my Holiday stencil line at Royal Design Studios. There are two different tree stencils that worked perfectly with the project.
Occasionally, I step in to help here and there to lend a hand, but most of the time, everyone does a great job on their own.
It was a fun DIY Christmas tree farm holiday sign workshop! We have fun December workshops coming up, and some really special events for the holidays. Our next event is our big holiday open house!
We are going to have bites and sips, and I’m going to be doing a book signing for my book Creatively Christmas! We are also going to be at The Three French Hens holiday market in Morris, IL. I hope you’ll join us for all of the fun and holiday cheer!
The post DIY Fresh-Cut Christmas Tree Farm Holiday Sign Workshop appeared first on Jennifer Rizzo. from https://jenniferrizzo.com/2018/11/diy-fresh-cut-christmas-tree-farm-holiday-sign-workshop.html |
About UsHi Im Veronica. Im a mum of two. Living in the UK. I absolutely love dressing my kids up in stylish little outfits and showing them off around town. When I'm not running around town with my kids, I'm shopping or designing my flat or someone else's. Part time interior designer and self appointed home decor expert. ArchivesCategories |


 RSS Feed
