|
My friends...we are just days away from moving into our house! We are beyond excited to get into our new home!! I can barely stand it.
Many of you have asked our our "in between" status -- it's not been very glamorous but it's worked well for us. I figure some of you will be in the same situation at some point so I figured it may be helpful to share what we've done! (I'm throwing in random photos of our old house because you do NOT want to see our mess of a place right now!) First things first -- in hindsight I wish we hadn't sold our home so quickly. Even though we had our buyers lined up, they had to sell their house and our (shared) realtor highly encouraged us to get it on the market during the summer. I am glad that we got the sales all done in plenty of time, but we didn't realize how much time we'd have to live in temporary housing. If we did it all over again I probably wouldn't have gotten the ball rolling quite as fast, but not worrying about the stress of selling/closing has been nice too. 
When we got the sale process started our realtor mentioned some nearby apartment complexes that offered short-term stays. I didn't worry about contacting them until we had our closing scheduled but when I did start calling, I had a bit of a freak out. None of the complexes he recommended allowed stays shorter than six months. I started to panic a bit and kept calling places to be told the same thing over and over. Finally one very kind employee of one recommended that I call newer apartments as they typically offer short term because they aren't full yet. I think she could hear the panic in my voice. ;) I finally found some complexes that did short term stays, but all did a minimum of three months. At the time we thought we'd only need about six weeks of housing so those were going to be crazy expensive for what we needed. This is the thing with a short term apartment situation -- we would have had to pay around $900 in fees just to move in. Most of that we would never see again. Some we'd get back if the apartment was left in good condition of course, but most (at least $600) we wouldn't get back. That was a tough pill to swallow. 
Remember, at the time we thought it would only be a six week wait, so that extra month would have been an entire month we would pay for and not live there. We were also going to have to pay movers four times -- for our moves in and out of our houses as well as the apartment. AND they only allowed two animals, we have three. It simply wasn't an option for us to give one up for even that amount of time. Soooo. It was discouraging. We started to think about other options. Friends suggested VRBO or other short term options but anything that allowed animals was insane expensive. Then someone mentioned a long term hotel situation and the more we looked into it the more we liked the idea. 
Here's what we loved about moving into a hotel instead of an apartment:
There are some downsides too -- mainly just the tight space. Six of us (three people and three animals) have shared less than 300 square feet for the past two months. At first it's sweet and cozy and we didn't mind it one bit. About four weeks in I started going a little stir crazy. :) Most of the time lately I spend the day out and about -- either running errands or sitting and working on my computer somewhere. And this time of year our evenings are always busy with marching band, basketball and fitness classes.

I have learned one thing through this experience...I will NEVER be a tiny house person. It's just not in my blood. I need space! Windows! Doors! Furniture! All the things!!
With all of the natural disasters and tragedies of late it's made me crave our home even more. I want to put roots down again, bake things, build something(s), organize stuff...my list is endless. I have a million recipes I want to try out, so many projects I'm ready to tackle and of course, I'm planning our Christmas decor. ?
Obviously the hotel option isn't for everyone! But if you only need a couple months to cover in between houses it may be best for you. We're spending about the same (or less depending on where we would have ended up) than what we would have paid at an apartment. We would have been dangerously close to having to sign another three month lease with an apartment too, so overall we've been really happy with our decision to stay at a long term hotel.
With all of that being said...I hope we never have to stay here ever again. God willing. Hotels have lost their luster for awhile. ? We are getting packed up, I'm cleaning the hotel room from top to bottom and then we are getting the heck out! Our new home awaits!:

Have you ever done the "in between" and what did you do? Did you enjoy it or go stir crazy like me? from http://www.thriftydecorchick.com/2017/10/our-in-between-living-and-why-we-chose.html
0 Comments
Goodness my friends...we're about a week out from moving in and I can barely stand it! We did our walk through today and things are really wrapping up. The house is so incredibly beautiful, I can hardly wait to show you. (If you missed our last update check it out here!)
I've been recapping all of my favorite room makeovers in our last house and it's been fun to look back! I LOVE before and after pictures anyway, but seeing the different designs over the years and all the work I put in is a great feeling. I'm sharing our bathrooms through the years today but you can look back at our dining room, guest bedroom, kitchen and family room as well! (See the bottom of the post for links for these rooms and their resources!)
When we finished our basement years back, we were able to complete the bathroom. It ended up being a long, narrow room because we added a laundry room and storage area as well. This is what we started with:

We went with a teeny tiny shower in here because we knew it wouldn't be used much. And then of course for years I ended up using it a bunch. ? We later put the cat litter trays back there so we didn't use the shower a lot the last year or so.
I knew I wanted to add some storage to this small space, and the area next to the shower was perfect for it:

You can see how I built the DIY floating wood shelves for that spot. This spot was screaming out for them!:

We really used them too -- they weren't just for looks. Other than the small vanity in there, this was the only storage in the room.
I decorated with some items from Target and it turned into such a sweet, pretty space:

I just loved the colors in this room! And of course, because there were no windows down there, I added the daylight bulbs I told you about earlier this week. ;)
The next before is one of the best in our whole house! Or I should say befores, plural. Our powder room was one of the first spots I added trim in our house and I went dramatic with the color:

I've always said you should do something fun in the smaller spaces in your home -- laundry rooms, powder rooms, mud rooms -- all great places to try a color or treatment you wouldn't do in a bigger living area.
And boy did I do that! Next was the chocolate brown bathroom...everywhere:

I mean. When I commit, I commit.
This was around the time I did the same with the dining room as well. I must have really loved brown at the time? I loved this
Well, my tastes changed. I slowly but surely started brightening up the house, and after a lot of wood and a LOT of painting, this was the result:

I get a lot of questions about that Hemnes bathroom vanity and YES I would highly recommend it! We had one little tiny sliver of the finish come off in all the years we had it, and that was right away.
Otherwise it's held up beautifully. It's a great deal for the size and the pretty sink that comes with it.

Later I finally painted that closet door black like the rest of the doors on the bottom levels and I loved it against all the white!:

See the awesome detail we put in that closet here. At first I didn't use it much but I came to LOVE having it!
And finally, my piece de resistance -- our son's bathroom redo. I worked my tail off on this room!! Blood, sweat and tears, literally. Here's how it looked for nearly ten years:


I had an itch to knock down that wall in the middle for forever. One day earlier this year I just decided to start taking it down. It was so exciting. ;)
It took me a few months but I finally finished the space. It's one of my top three makeovers in the house (I'd say up there with the kitchen and the dining/library). Here's how it turned out:

Oh I do miss that pretty shower! Someday I'll do the same tile in his bathroom at our new house...someday, a lot of days from now. ;)
I loved every single inch of this room. I am so proud of it:

I still love looking at it. :)
One room we didn't touch much (probably the only room in the house!) was our master bathroom. I shared that with you here -- I made some small changes over the years but since it was set up well and we knew it would be so expensive, we never tackled a big reno.
Bathrooms are no joke people! They are hard work -- even the small ones. But they make a big impact in your home and can give it tons of personality.
I'll be back next week as we pack up and count down the hours till we are in our house! As always, thanks for coming along for the ride all these years! :)
You can see more about each bathroom at the links below, but let me know if you have any questions!:
- Resources and links for this bathroom
- Resources and links for this room
from http://www.thriftydecorchick.com/2017/10/hits-and-misses-bathroom-renovations.html One of the nice things about having the shop, is being able to have some creative time on the job, and the boss can’t yell at you for not doing your work
I painted this larger piece of black and white abstract art in the Makery. Once it dried, I wanted to frame it, but large,custom wood frames are really expensive. I had seen several creative ways to build a frame around a canvas, and decided to try it myself. I used 3/4 inch pine slats from the home improvement store, that were about 60 cents a linear foot. I had about 16 feet including waste for the inexpensive framing idea. To see a DIY wood frame on pretty abstract art with a chunkier frame,and slightly different technique, you can see this tutorial from Jen at City Farmhouse.
I cut them to size around the perimeter edge of my canvas,making the top pieces longer, so they overlapped the shorter sides to make a clean corner instead of cutting miter cut.
I stained them with English Walnut stain on both sides and let dry.
Once they were totally dry, and the stain smell was gone, I glued them directly onto the frame.
You can see how the longer pieces meet up with the shorter side pieces to make the corner.
Once I had them all glued together, I carefully flipped it over and ran a bead of hot glue down the backside where the canvas met the wood. To hang, I added a saw-tooth hanger to the back of the canvas frame. I love how the stained,dark wood makes it looks so finished,and the total was less than $12! I can’t wait to show you how it looks in the room!
For more DIY art ideas. Check out this post on using botanical prints, or this Thanksgiving printable, Save Save Save Save The post inexpensive framing idea for black and white abstract art appeared first on Jennifer Rizzo. from https://jenniferrizzo.com/2017/10/inexpensive-framing-idea.html
We are on the countdown! Now we can say we move in "next week" -- how exciting is that? The house is pretty close to done inside, just the island countertop to install and a few minor things to address. We have a couple bigger projects outside that need completed too. Our walk through is this week...one step closer!
It probably sounds funny, but some of the projects I want to complete first are not decor-related. Well, at least not in the traditional sense. I want to tackle some lighting projects first, but not just installing lights. I added so many little lighting "tricks" in our old house that made a HUGE difference in the way we lived in it. I plan to repeat every single one of these.
Here's a recap of my favorite lighting changes!
The daylight bulb:
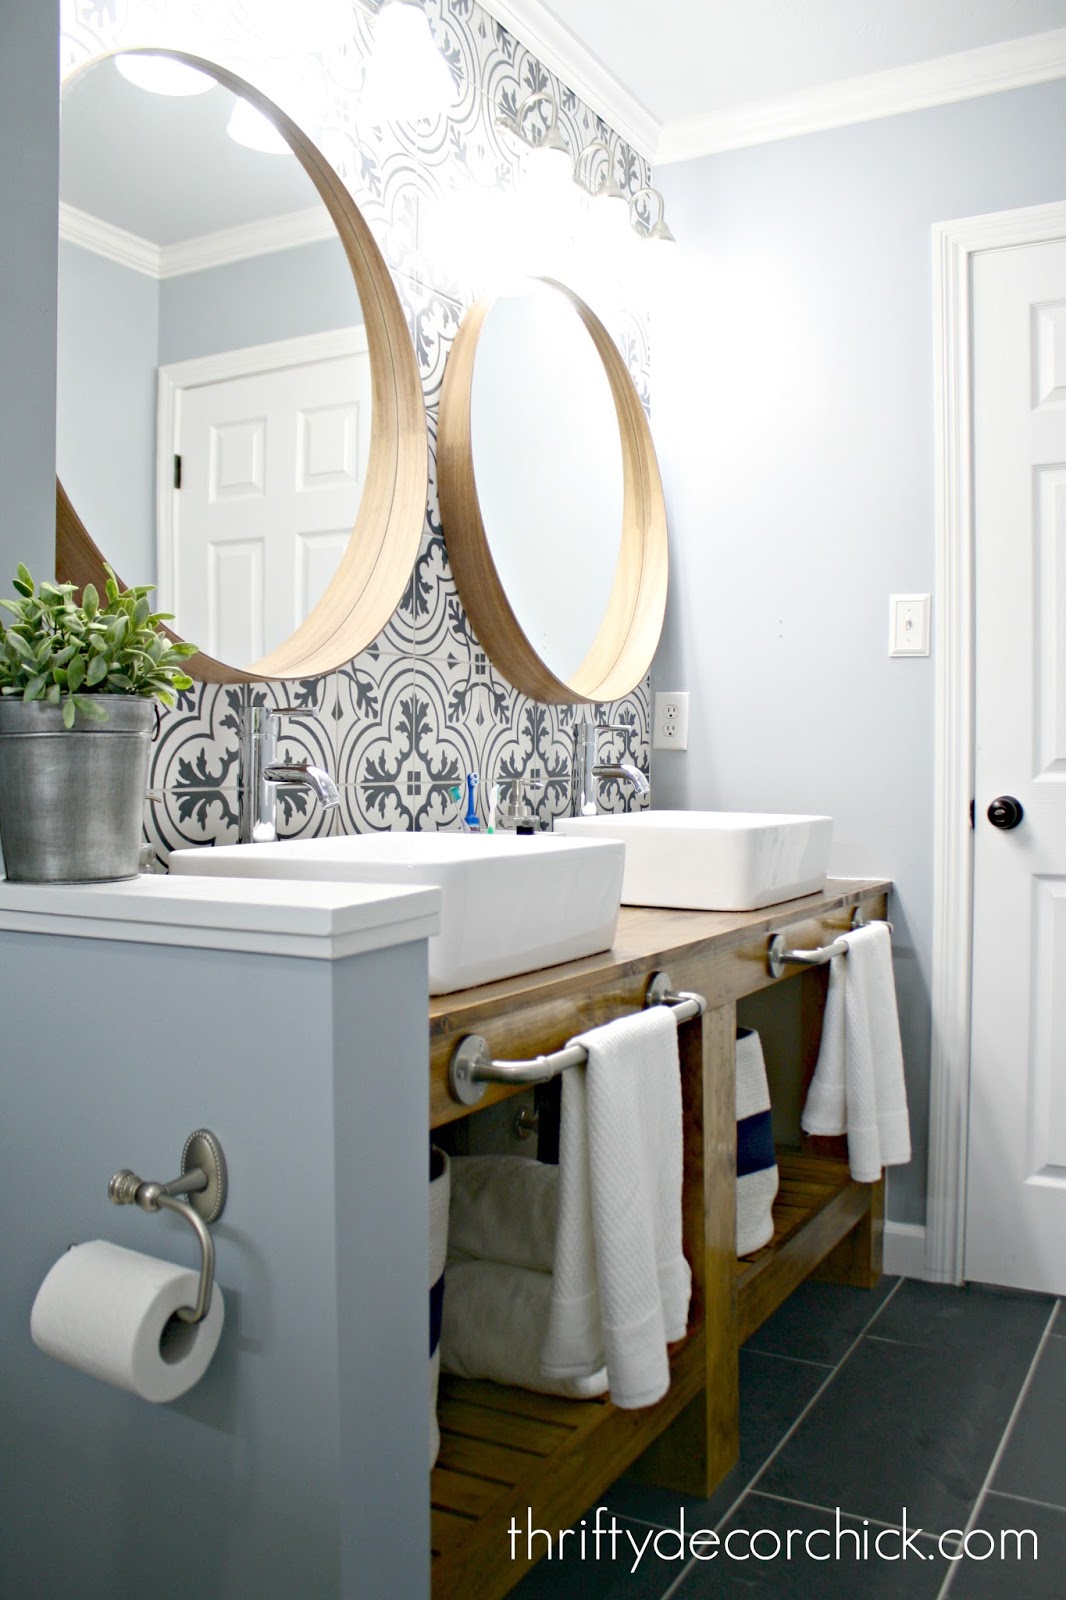
First up...most of the bathrooms in the new house have windows, but I'll still be adding the amazing daylight bulbs to them anyway. They make a HUGE difference at night and during the day. I mean...big. You can see them in my son's bathroom here:

I discovered them a couple years ago and ended up changing out all of our bathroom bulbs to daylight. They change not only how YOU look, but they completely transform how the room looks too, even during the day. Incandescent bulbs give off a yellow tint and daylight makes everything it's true color.
You can see the drastic before and after of the daylight bulb in this post. Our new basement has some windows, but not a ton, so eventually I'll trade those out too. The old basement had zero windows and I couldn't believe how much better it looked with them!
A few things to consider -- they are bright! Get the dimmable ones (more about that in a minute) if you think that will bother you. Also, I don't like them in most living spaces or bedrooms -- I tried them in our kitchen and hated it. I still enjoy the incandescent look for those rooms. But if you want to see how your makeup really looks, go for daylight in the bathrooms. :)
Dimmers, dimmers everywhere:
That brings me to the next change I'll be making -- GIVE ME ALL THE DIMMERS. Yes, we could have had our builder install them, but we'd pay more. You can get them for around $15 at the hardware store and if you know what you're doing it only takes about ten minutes to change them out.
I shared a dimmer switch tutorial years ago that will show you how to install one yourself. If you have any electrical experience at all, you can do this (even if you don't!). There are single pole versions (where you only have one switch that operates one light) or a three way (one light operates from more than one switch). I already have plans to add them to all of the bathrooms, our family room lights and the kitchen lights. Oh, and the basement. Basically our whole house. :)
Our friends who bought our old home laugh at how many we had...but they are the bomb. Especially on a dark winter morning when you want to wake up slowly. Or a midnight run to the bathroom when you only need a little light. Or when you want it cozy at night. OH and they use less energy (when dimmed) and I hardly ever changed out bulbs I had on dimmers...they rarely went out. I adore these and will be adding them everywhere.
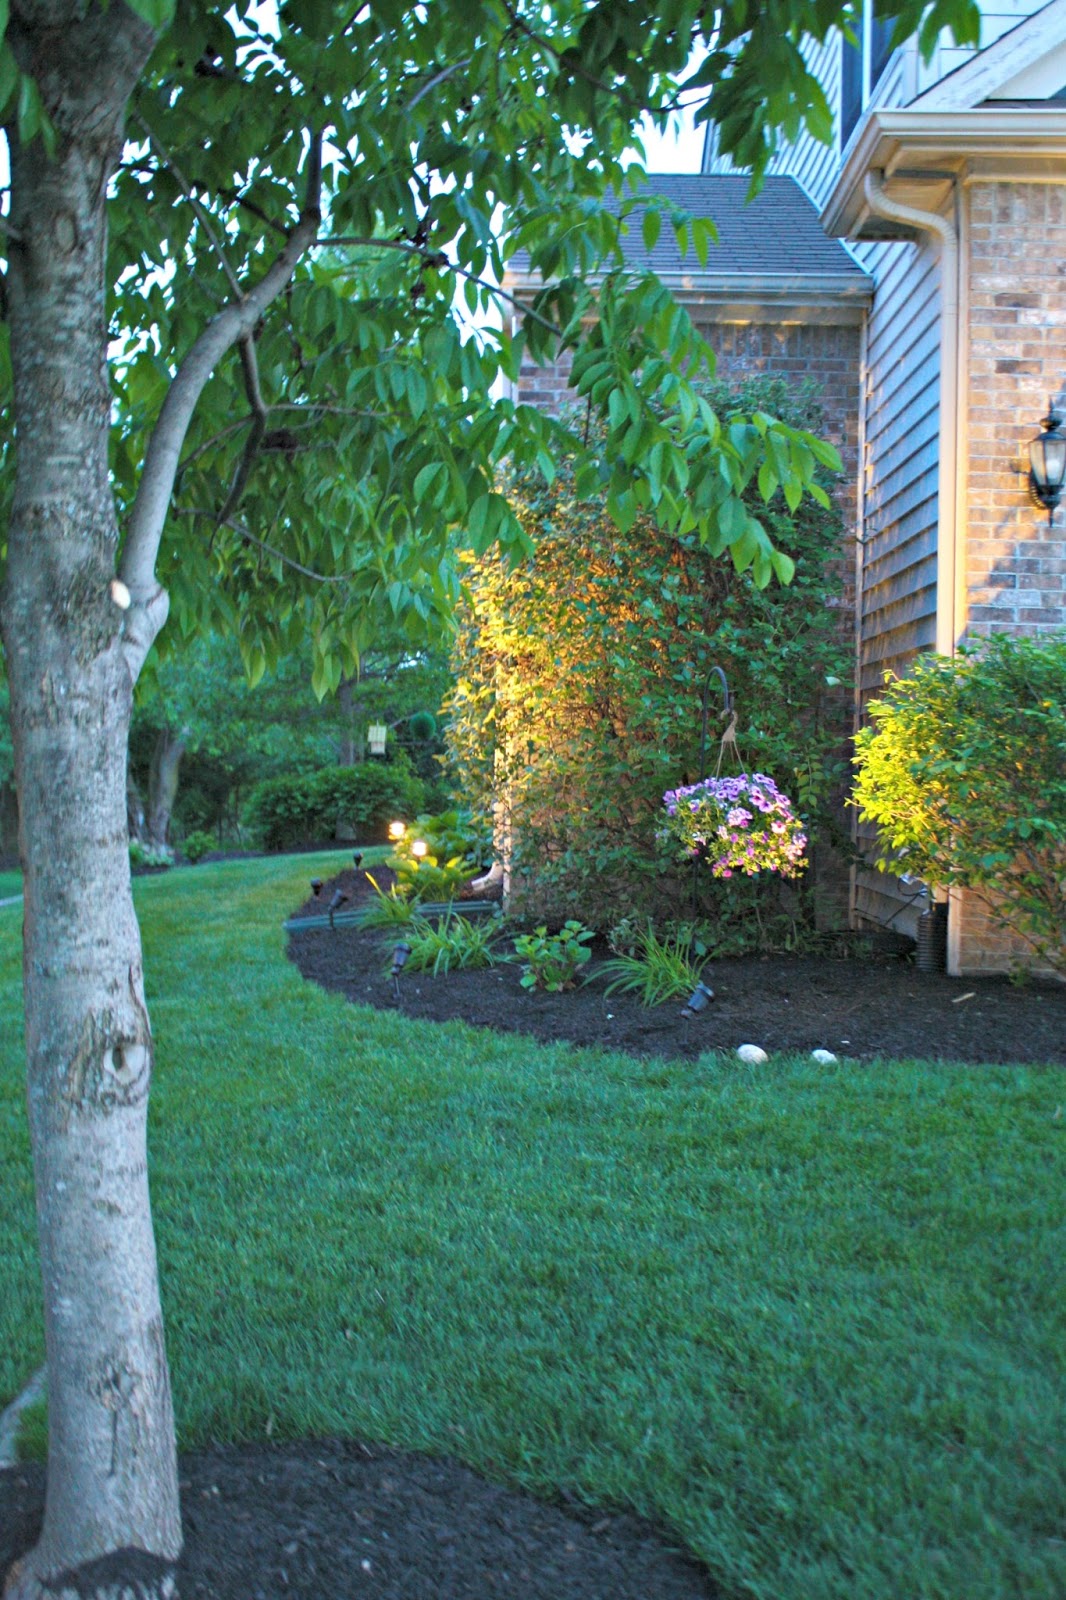
Landscape lighting:
I joke about this but it's true -- drive around a "fancy" neighborhood at dusk (my favorite time of day) and there will be a common detail that most of the houses have. At first it's hard to put your finger on it but they all look so expensive, and yet cozy because of landscape lighting:
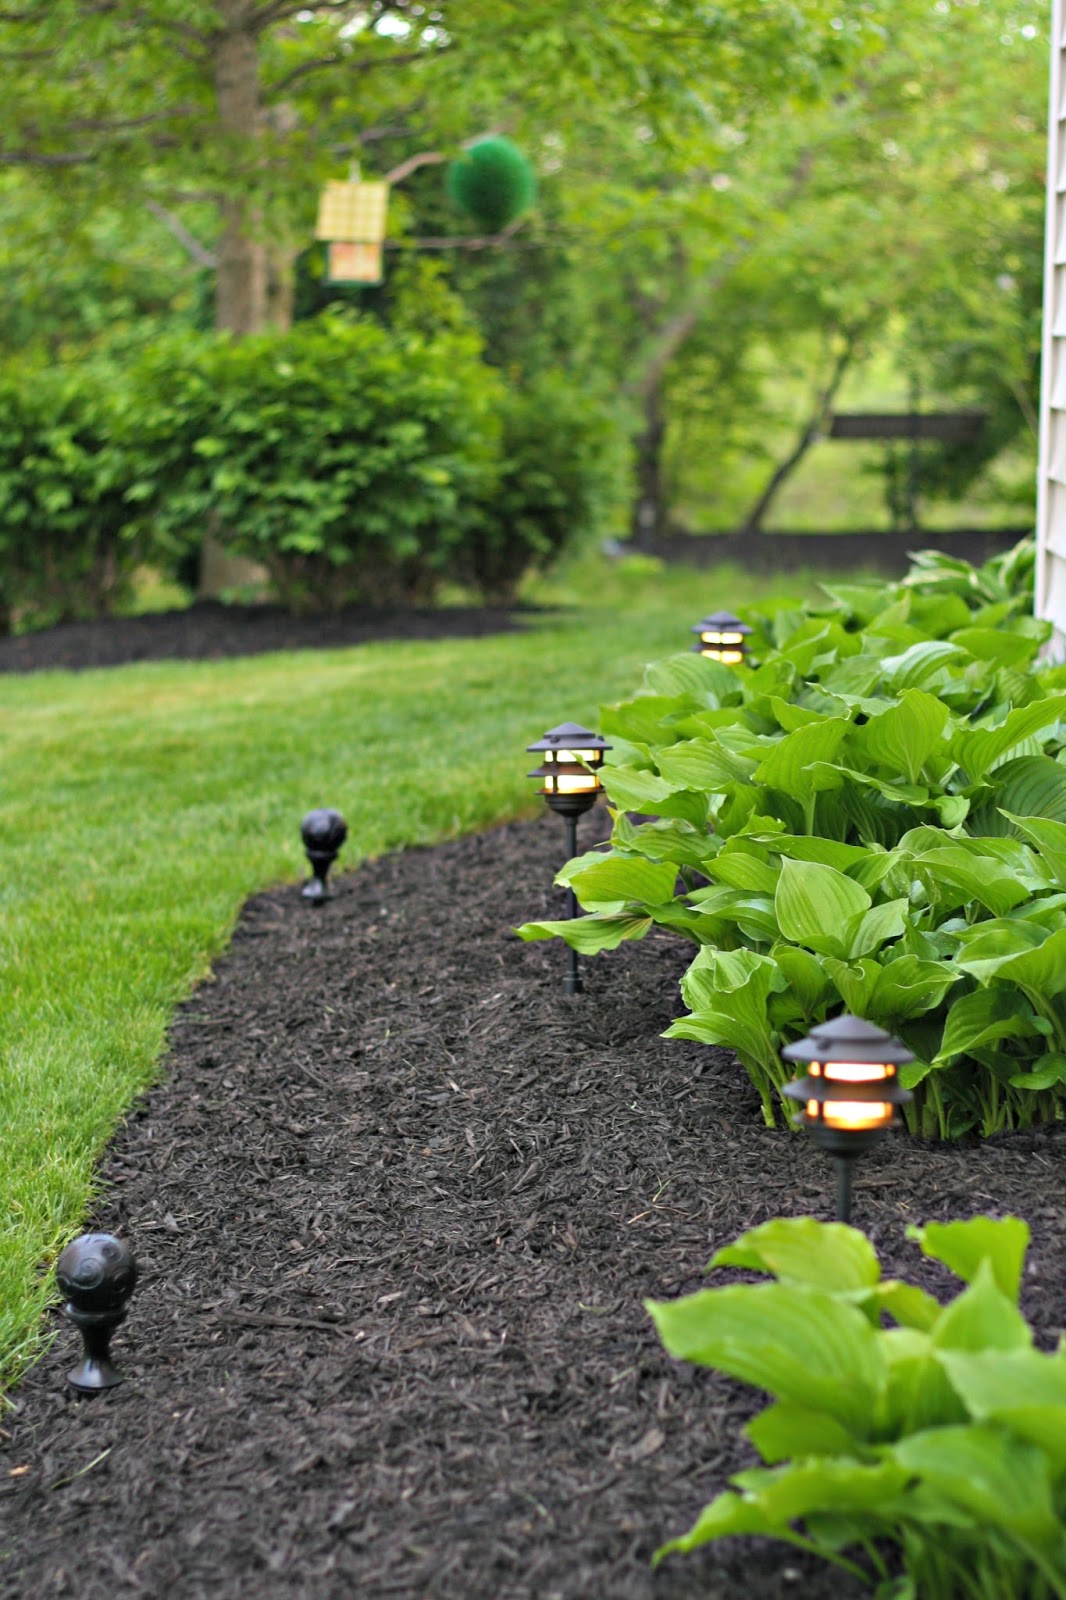
It's just something that makes a house feel fancier, but also super approachable because...well, so much pretty light. I wanted to copy the look at our house and the first time I did it, I was totally hooked. I used directional lights that lit up the front of the house as well as smaller lights in the landscaping.
You DO not know how to to change a light fixture, a plug, or install a dimmer to be able to do your own landscape lighting. I promise. It is WAY easier than you think it would be. You plug in a box and then connect the lights to the wire -- but it's just a matter of snapping them on. I shared a step-by-step tutorial for landscape lighting here.
One of the first things I did at the new house was make sure we had outlets in specific spots so I could add them to the front of the house right away. Our exterior is going to look even more beautiful when I get those installed. I hope to do it before the cold temps hit, so I'll be sure to share it with you.
Upper and lower cabinet lighting:
This is another update that was one of my favorites in the house. I've done this myself a couple times over the years -- the first time I installed them (without any new outlets or wiring) I used actual fixtures you plug in and switch on.
This last time I used an outlet to run them on a switch and it was SO EASY:

I shared exactly how I did it and all the materials I used (all from Amazon) in this cabinet lighting post. These little lighting strips pack a big punch!:
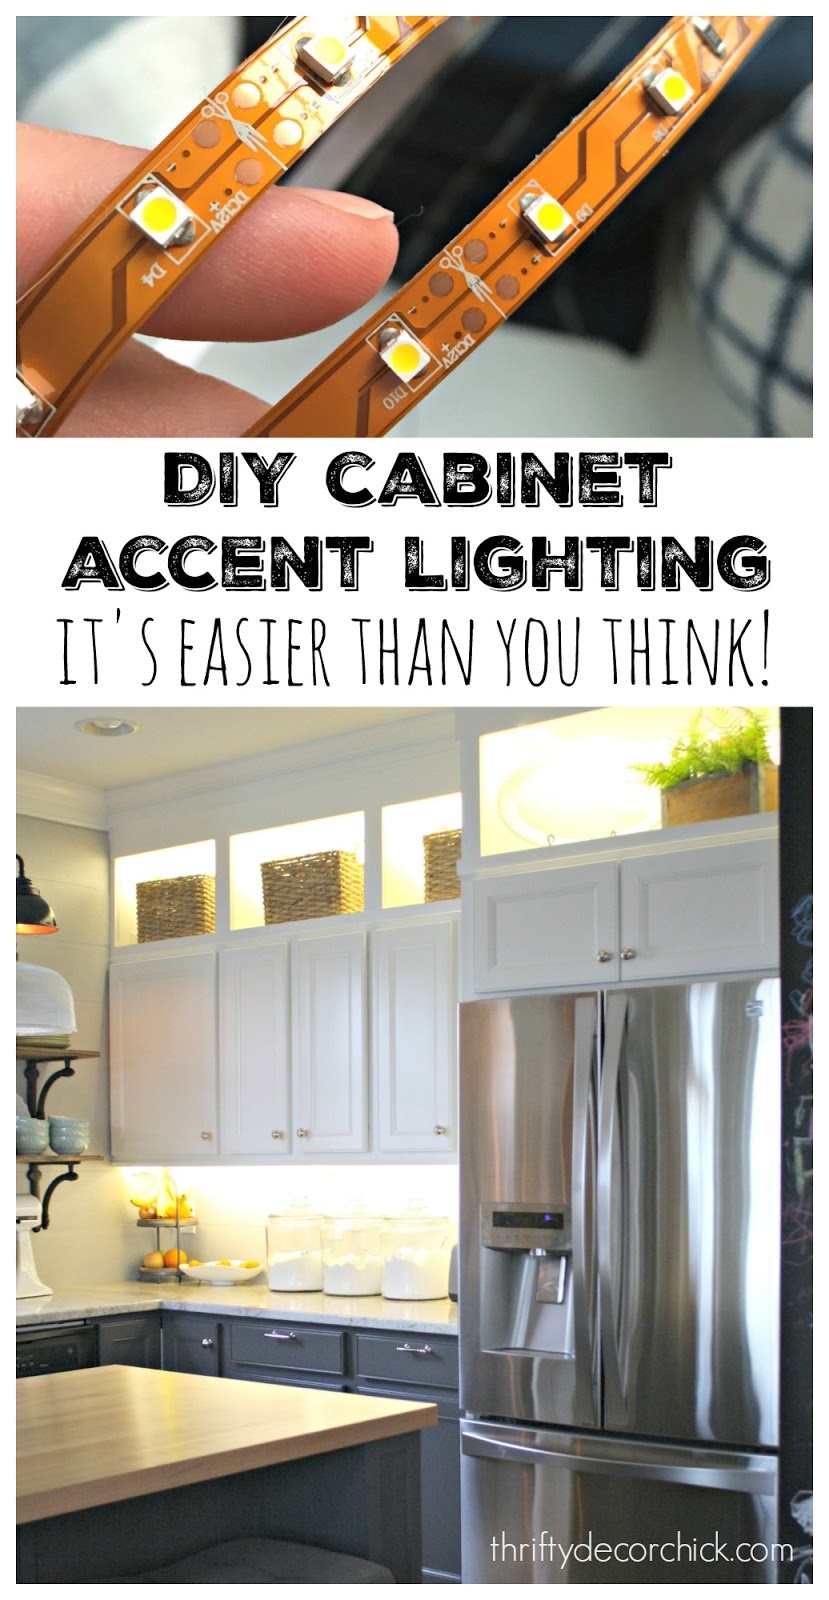
Our new house already included the under cabinet lighting so we paid to have them add some to the uppers as well. I plan to add them to our future basement kitchenette as well. They are SO lovely at night! We absolutely love them -- this lighting is another detail that isn't expensive but makes your kitchen feel custom.
Sensor switch:
OK...this one is the bomb. It rocks, especially if you/your kids/your love/your mom/anyone tends to leave the lights on in your house. I changed our our master closet light years back and then moved this one to our mud room:

The new light was perfect in there (I don't think I ever shared it with you all) because it was a lot shorter. But man, it was BRIGHT. I tried something different in here instead of the traditional dimmer -- a sensor switch:

They do just that -- sense when you walk in the room and they turn on the light. You don't touch it! The best part about ours was it also had a dimming function, so you could set it to the amount of light you wanted each time it turned on. When we walked in the room, it turned on. No reaching for a switch. It's GREAT for closets. And within a set amount of time, it goes off. If you are still in the room and it senses your movement, it will stay on. The only bad thing about these lights is that if you are sitting on the floor folding clothes or organizing, the light will turn off. Many times I'd have to wave my arms wildly to turn in back on. ? But those were few and far between. Totally worth it and I plan to add them in our closets again. I love every single one of these lighting tricks and will be adding each one again. They are easy fixes that make your home feel warm and cozy, but are also super functional as well. Here's a recap of the posts I mentioned above as well as links to some of the items I talked about. (Affiliate links included for your convenience.) If you have any questions please let me know!
Get the daylight bulb here
Dimmers (for incandescent bulbs only)
Get the sensor switch here
How to install landscape lighting (with list of supplies)
How to install cabinet lighting (with full supply list)
from http://www.thriftydecorchick.com/2017/10/five-lighting-tricks-that-make-big.html Cleaning is generally not my first pick for fun past-times, that’s why I generally don’t really talk about it here. While I love a really clean house,I would much rather be making things, and hanging out with my people at home, than cleaning our bathroom. However, I recently received a steam cleaner from HomeRight, and decided to try it out, and give our bathroom a cleaning once-over. I knew our bathroom faucet was kind of gross. People use it day in and day out. I’ve washed my hands covered in paint in there, and we have kids,enough said. It does get cleaned on a weekly basis, but now that cleaning the bathrooms are on the kids chore charts, they probably are not as spotless as they can be. This close up picture of our faucet proves it. One of the children (who shall not be named) insisted they cleaned it. Just FYI. If you ever go to grab a glass of water at our house, check your glass before you drink out of it too. They also unload the dishwasher.
I took to cleaning our bathroom faucet with the steam cleaner like a crazy person after I saw how gross it was. I read through all of the steam cleaner directions first to make sure I wouldn’t either A. Ruin my faucet or countertop B. Burn myself, then I got to work. Warning: If you are having breakfast, come back and read this later.
I started on top, and wiped it down. It didn’t look that bad.Then, I started hitting the lower part of the faucet.
All of the junk that started coming off totally grossed me out. I can’t make this up. How does all of that crud lurk in there? It took about 6-7 minutes, and I let the excess water cool a bit and wiped everything up.
It’s like a brand new faucet! Now, I am totally obsessed with how gross it gets between deep cleanings, and tackle the shower and the kitchen faucet next!
This post was sponsored by HomeRight , opinions are entirely my own.
The post Steam cleaning our bathroom faucet appeared first on Jennifer Rizzo. from https://jenniferrizzo.com/2017/10/steam-cleaning-bathroom-faucet.html
I LOVE writing these posts! It thrills me to no end when one of you replicates a project of mine or uses one as your inspiration. And it makes me so happy when you share it with me. (If you've done a project please send it to me!)
This weekend I wanted to show off a few of the lovely folks who tackled projects in their own home (and did them beautifully!).
First up, Melissa shared her makeover with me on Instagram -- she used my board and batten tutorial in this living space:

I LOVE how it turned out and this shows how great it looks with more modern furnishings. (I love everything in here!) It's hard to go wrong with board and batten on the walls:
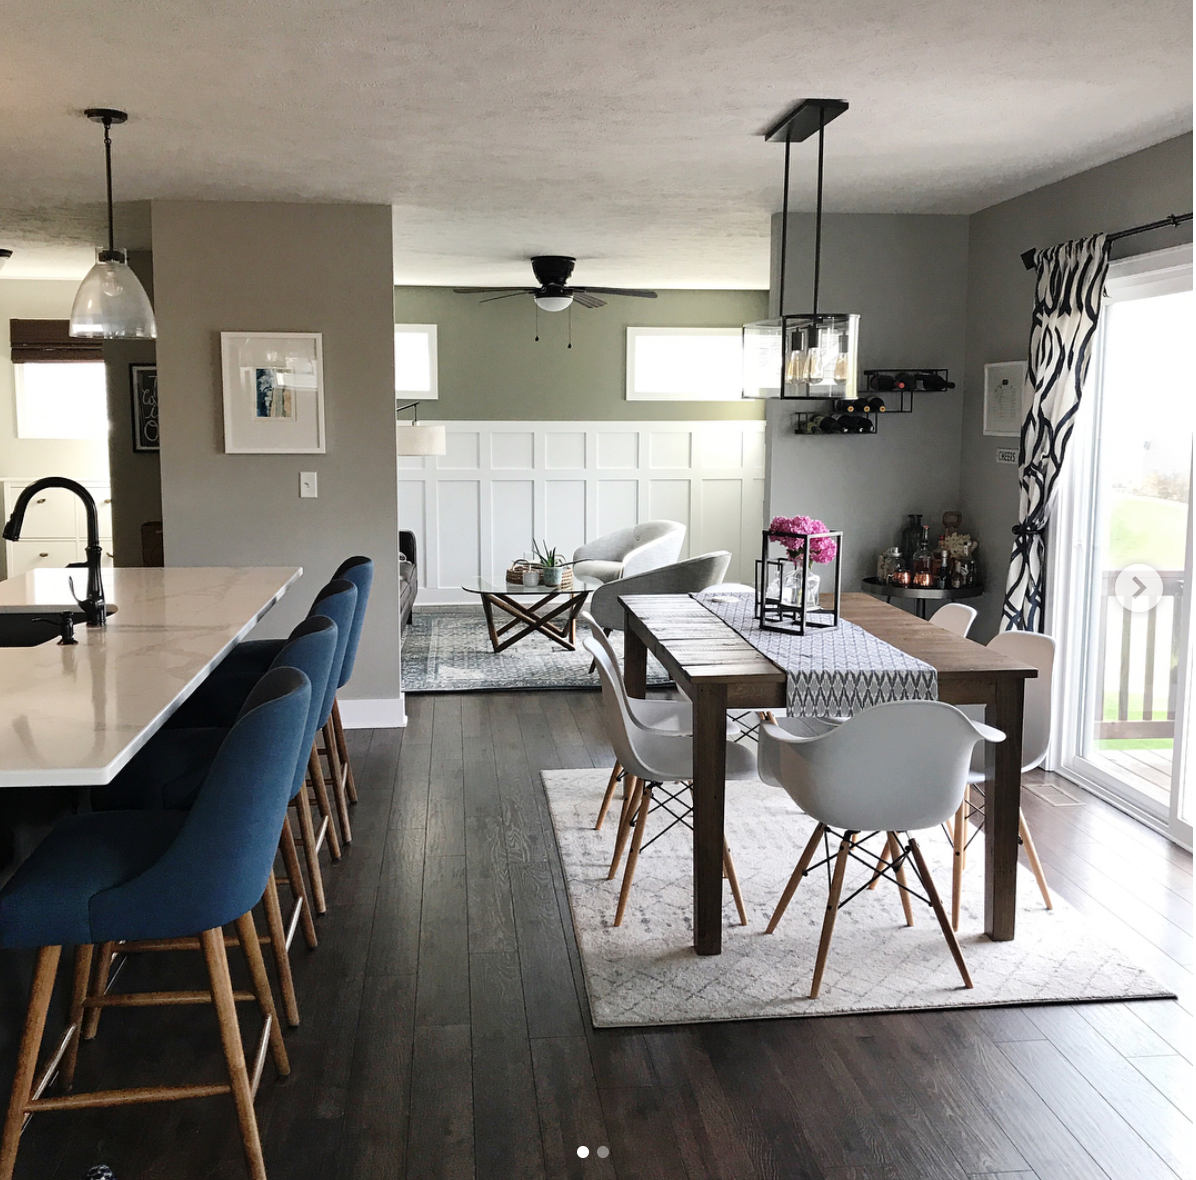
You can find Melissa's Instagram here at MK_athome.
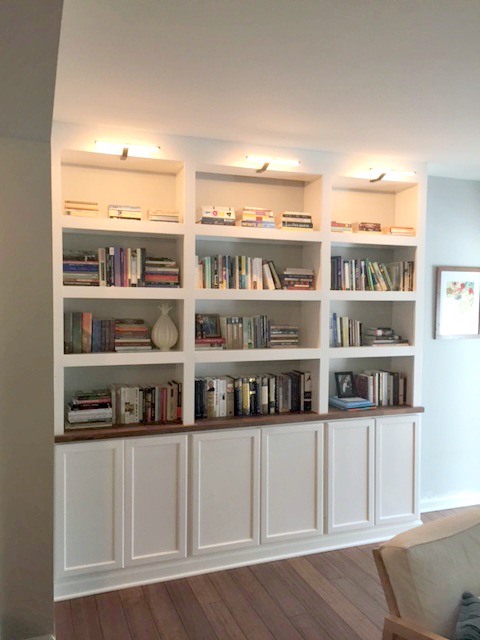
I shared Merrin's take on our built in bookcases earlier this week because I plan to copy her color next time I do them. ;)

Love them in gray and mixed with the wood tones!
Carla sent me photos of her island painted in peppercorn like ours and my jaw hit the floor because her kitchen and family room are so gorgeous!:


The dark gray is a perfect accent in there! And isn't that family room so cozy and pretty? Goodness I can't wait to have a house again. :)
And last but not least, Lauren shared her DIY bookcases as well:
I love the library lights, they did so good. Perfect! The great thing about these bookcases is they offer so much storage as well. It's just a great combo.
Hope you enjoyed these! I love when you do what I do. ;) If you have photos you'd like me to share please send me an email (click on the "contact" tab at the top of my page). I always appreciate that you take the time to send me what you've done in your home!
Check out some of the other reader projects I've shared in this post and this one as well.
from http://www.thriftydecorchick.com/2017/10/my-projects-in-your-house.html Happy October! Danielle from Finding Silver pennies and I are teaming up to share five ideas for pumpkins with you each, so that’s a total ten fun ideas for pumpkins! I thought it would be fun to take some faux pumpkins and paint them in patterns inspired by vintage rugs. I am a bit ga-ga right now for vintage Kilim and woven rugs. I would love to be able to buy a few to scatter around my house. I just love the patterns, the color combinations,and the fact that they are so detailed, and so beautifully handmade.
I played with color and pattern on two craft pumpkins. You could do this on real pumpkins, but I have to be honest, it took me so long to paint them, that I would hate to either toss them in the bin November 1st, or have squirrels eat holes in the sides of them.
This way I can pull them out year after year, and enjoy them.
I used a paint marker to outline my edges, and DecoArt paint to fill in the patterns. To keep them outside, they are sealed in a matte varnish. I made one really colorful, and went with a little more of a simple pattern on the other.
it was fun to mix and match colors as well.
I think I am going to make a few more to add to my collection.
I love how they are unconventional, just like my boho pumpkin topiary from a few years ago.
Another fun pumpkin project is casting mini-pumpkins in concrete! If you’ve never casted before,it’s a really fun project.
If you buy faux pumpkins on close-out at the end of the season, its easy to change the color of your pumpkins with a chalk style acrylic paint, and make them match your decor, or a little more realistic.
I love using pumpkin in recipes too. And one of my favorite ways to enjoy real pumpkins is in this delicious Sour cream and roasted pumkpin soup.
It’s one of my favorite fall soups! Stop over at Danielle’s for more fun, fall, and pumpkiny ideas!
The post Five ideas for pumpkins appeared first on Jennifer Rizzo. from https://jenniferrizzo.com/2017/10/five-ideas-pumpkins.html
We are counting down the days!! Only about two weeks till we move in to our house and we can hardly even stand it. I am SO ready to be settled again, I cannot even tell you. I've never taken our home for granted but I have a whole new appreciation for a home base. I plan to move in and not leave the house for weeks. :)
I mentioned that many of our friends and family have asked what I'll do now that we're moving into a house that is "done." HA! Same thing I did before...tweak it for years to make it ours. I cannot wait! Even though we got to pick out everything for the house there's plenty we didn't do for cost reasons or because I wanted to live in the house first. And there's plenty I'll do to add my personal touches.
I have a long list, and one of the rooms I'm most excited about is my office. It's going to have a different feel than the craft room/office I created for us in our last house. That one was fun, bright and white. This one will be just for me (the family will use it occasionally) so I want to do something a little different. I've known what I'm doing pretty much from the start, which is rare for me. Usually I have to sit on it for awhile.
Here's a reminder of the room, this was before flooring went in obviously:

We did carpet in here to save money (and in our master as well) and someday I'd love to put our hardwoods in. But for now I'm digging the comfy feel.
I have three windows in this room -- one small one you can see in the photo and two to the right. The room gets GREAT light. I just love this space. My immediate thought when I walked in here the first time, even without windows and drywall, was it was screaming for these at the back of the room:

Right?? A perfect spot! If you missed my post on those earlier this week you can go here to see more about my DIY bookcases.
I may have to change things up a bit because of that little window -- either the bookcases won't be as deep as they were before and will go just to the window (which is nearly a foot), or I'll build them to sit in the middle of the wall with just a bit of space on either side. (More like a large piece of furniture.)
But I have a big change in mind for these -- Merrin happens to live near me and when she showed me their version of our built ins, I was drooling:

One, because it was almost exactly what I envisioned for the layout of this room, and two, because I absolutely LOVE that they painted them gray. It's just moody and pretty and I love it.
I love that I inspired her and in turn she inspired me! So I think that will be the direction of the color.
I showed you the desk last week -- I've always loved this one and I can just see it in my mind in this space:

It will float in the middle of the room under the light. It's nice and long and plenty deep as well. Love that there's a small drawer too. I plan to dress it up a bit with some hardware.
I've had it in my head that I was going to use this beaded chandelier (also from the library in our old house) over my desk, and since we know the buyers of our house we worked it out ahead of time that I'd come take it down (they have one to replace it):

I LOVE the look of it, but bear with me here. Now I can't decide which way to go, because it doesn't let off good light. We put an outlet in the floor so I can plug in a lamp on the desk, but I'd still like a good source of light from the ceiling too.
This is what it looks like when turned on:

I first tried it under the table in our old kitchen and with that weird light on the ceiling it was almost dizzying. I hated it in there (at least at night).
I later put this one up over the table instead, (and they have since replaced it), so now I'm considering this one instead:

It lets off plenty of direct light, which is what I want in the office. I'm just afraid it may be too big in there.
Decisions, decisions! I love both, but the practicality of the metal one may win out.
There's a spot to the right when you walk in the room that is the perfect for this beauty:
I measured for it weeks ago and it is going to be a perfect fit. :) I used this for office supplies in our family room so everything will go right back in the drawers when I unpack.
The wall to the left when you walk in is really long -- I won't put any furniture there but have this art in mind from our old house for that big wall:

The built ins probably won't happen till next year. In fact, I'm going to say they for SURE won't happen till next year. I have promised myself no big DIY projects for the rest of year. The last minute fixes and projects I had to finish up before we moved out of our old house just about did me in, so I need more of a break to focus on the holidays before jumping in to anything new.
But do you see my vision?? Pretty, right? Which light would you choose? Can't wait to be writing to you from this space!
Affiliate links included for your convenience!
from http://www.thriftydecorchick.com/2017/10/the-design-plan-for-my-new-office.html
We are counting down the days!! Only about two weeks till we move in to our house and we can hardly even stand it. I am SO ready to be settled again, I cannot even tell you. I've never taken our home for granted but I have a whole new appreciation for a home base. I plan to move in and not leave the house for weeks. :)
I mentioned that many of our friends and family have asked what I'll do now that we're moving into a house that is "done." HA! Same thing I did before...tweak it for years to make it ours. I cannot wait! Even though we got to pick out everything for the house there's plenty we didn't do for cost reasons or because I wanted to live in the house first. And there's plenty I'll do to add my personal touches.
I have a long list, and one of the rooms I'm most excited about is my office. It's going to have a different feel than the craft room/office I created for us in our last house. That one was fun, bright and white. This one will be just for me (the family will use it occasionally) so I want to do something a little different. I've known what I'm doing pretty much from the start, which is rare for me. Usually I have to sit on it for awhile.
Here's a reminder of the room, this was before flooring went in obviously:
We did carpet in here to save money (and in our master as well) and someday I'd love to put our hardwoods in. But for now I'm digging the comfy feel.
I have three windows in this room -- one small one you can see in the photo and two to the right. The room gets GREAT light. I just love this space. My immediate thought when I walked in here the first time, even without windows and drywall, was it was screaming for these at the back of the room:
Right?? A perfect spot! If you missed my post on those earlier this week you can go here to see more about my DIY bookcases.
I may have to change things up a bit because of that little window -- either the bookcases won't be as deep as they were before and will go just to the window (which is nearly a foot), or I'll build them to sit in the middle of the wall with just a bit of space on either side. (More like a large piece of furniture.)
But I have a big change in mind for these -- Merrin happens to live near me and when she showed me their version of our built ins, I was drooling:
One, because it was almost exactly what I envisioned for the layout of this room, and two, because I absolutely LOVE that they painted them gray. It's just moody and pretty and I love it.
I love that I inspired her and in turn she inspired me! So I think that will be the direction of the color.
I showed you the desk last week -- I've always loved this one and I can just see it in my mind in this space:
It will float in the middle of the room under the light. It's nice and long and plenty deep as well. Love that there's a small drawer too. I plan to dress it up a bit with some hardware.
I've had it in my head that I was going to use this beaded chandelier (also from the library in our old house) over my desk, and since we know the buyers of our house we worked it out ahead of time that I'd come take it down (they have one to replace it):
I LOVE the look of it, but bear with me here. Now I can't decide which way to go, because it doesn't let off good light. We put an outlet in the floor so I can plug in a lamp on the desk, but I'd still like a good source of light from the ceiling too.
This is what it does when turned on:
I first tried it under the table in our kitchen and with that weird cast on the ceiling it was almost dizzying. I hated it in there (at least at night).
I later put this one up over the table instead, (and they have since replaced it), so now I'm considering this one instead:
It lets off plenty of direct light, which is what I want in the office. I'm just afraid it may be too big in there.
Decisions, decisions. I love both, but the practicality of the metal one may win out.
There's a spot to the right when you walk in the room that is the perfect area for this beauty:
I measured for it weeks ago and it is going to be a perfect fit. :) I used this for office supplies in our family room so everything will go right back in the drawers when I unpack.
The wall to the left when you walk in is really long -- I won't put any furniture there but have something in mind from our old house for that wall. It's a biggie.
The built ins probably won't happen till next year. In fact, I'm going to say they for SURE won't happen till next year. I have promised myself no big DIY projects for the rest of year. The last minute fixes and projects I had to finish up before we moved out of our old house just about did me in, so I need more of a break to focus on the holidays before jumping in to anything new.
But do you see my vision?? Pretty, right<
from http://www.thriftydecorchick.com/2017/10/we-are-counting-down-days-only-about.html While it was exciting to watch the stain go down on the sanded floors, it was even more thrilling to watch the end result of our refinished wood stained floors appear.Even thought it was only a week’s time from the moment we pulled our carpet out, until we could move our furniture back in, it seems like much longer when you are all living together in the family room like a bunch of cats. The best part of the Bona process is that we didn’t have to move out, but, there’s nothing like sleeping with your mattress on the floor with your kids for a really good night’s sleep. When they started sanding the floors, and used their dustless system, it was truly dustless, and kind of amazing. Now, I won’t lie. The stain did smell, but not like the first time we had our downstairs floors done 7 years ago. That was completely unbearable, we couldn’t even leave plants in the house. We found this time that while the top coat had the stronger of the smells (and at initial application, I was a bit concerned we were going to have to stay at my moms for the night.), by bedtime, it had mostly dissipated, and was only a faint paint-like odor. If we would have had to have slept somewhere else during the process, that would have been the night. Even at that, one night would have been better than the entire week we had to do 7 years ago.That was horrible, and still smelled strong for weeks after. The only odd thing we noticed is for the next few days after the staining and refinishing, is that when we turned the oven on, it smelled almost like propane in the air. It was super-weird, but it eventually went away.
The unfinished wood was so beautiful, it was hard to commit to staining them. However, light floors in this house wouldn’t work, so after Exquisite Flooring mixed the stain, he sprayed water on top to bring up the grain for the dark stain. I tried to grab a pic while he was moving. It seems so counter-intuitive to put water on your fresh and cleanly sanded wood floors.
After the floors were water-popped, the stain went down. We couldn’t walk on them for 24 hours. I could see part of the floors from the hallway, and I was so giddy, I could barely contain myself.
While that was going on, I was able to take part in a fun video about my experience with Bona…coming soon!
I am so in love with the color! I can’t believe that red oak was lurking under that nasty carpet for so long! When we could finally walk on them, and really take it in, we just couldn’t believe that these were our floors. The custom mixed Bona stain color was amazing!!
Each room was so beautiful, and you couldn’t even see the slight pet-staining.
I know, I am one of those few weird girls who gets totally excited by wood floors. I am beyond thrilled with the entire thing.We should have had our refinished wood stained floors done years ago! It was such a great experience, and the result is even better than I thought it would be!
Of course, now the rooms all need makeovers…right?
This post is sponsored by Bona. Opinions are entirely my own. Save The post Our refinished wood stained floors appeared first on Jennifer Rizzo. from https://jenniferrizzo.com/2017/10/our-refinished-wood-stained-floors.html |
About UsHi Im Veronica. Im a mum of two. Living in the UK. I absolutely love dressing my kids up in stylish little outfits and showing them off around town. When I'm not running around town with my kids, I'm shopping or designing my flat or someone else's. Part time interior designer and self appointed home decor expert. ArchivesCategories |
 . Occasionally, we won’t be crazy busy, and I’m able to pull out my paints or other creative supplies and make something fun. I’ve been working on a bedroom makeover since we had our floors redone, and I wanted a piece of black and white abstract art with a wood frame for behind our TV. I know that seems odd, to paint something just to have it partially covered up, but the area behind the TV looks so bare with just a wall behind it.


 RSS Feed
