|
I know I normally chat about lifestyle, home, and crafty projects here, but today I wanted to talk about something that a lot of you commented on when I did a recent IGTV episode…Being an extroverted introvert. I think a lot of creatives and bloggers are (It’s sometimes also referred to as an ambivert, you can see my original IGTV video below, or skip ahead to the rest of the video.).
Growing up, I always had that slight kind of like I never fit in ,and I never felt like I felt comfortable in my own skin. I was really happy to be in a group of people and go to parties…for a little while. Then I wanted to go home and be alone with my books. I wanted to chime into conversations and be included, but I felt like the things that came out of my mouth were super socially awkward, and then I wondered if it was because I said the wrong thing all of the time. I was bullied in junior high and high school, so that added to the feelings of awkwardness, and being out of place. I thought I was a total weirdo.
I knew felt reserved, but I didn’t really fit into the mold of a typical introvert. I loved performing, and I could be on stage for hours singing in front of people in a musical. I would also have these amazingly deep, intense friendships, where we talked all night… but put me in a party with a room full of people, and after about an hour, I was ready to run out the door. I would feel drained after a while. It did help me stay out of trouble in high school, because the idea of going to a late night kegger with loud music was the last thing on my mind.
Now as an adult, I love speaking and teaching workshops and classes, and engaging with people, but I recognize I need time after to decompress after. I don’t mind being by myself either. Even when I’m alone, I never feel lonely. I enjoy the solitude and the time to do my thing.
When I discovered that I am probably classified as what’s called an extroverted introvert, I felt relieved, it explained everything!You can read this article about it here on Buzzfeed. It was kind of a mind-blowing moment for me. Suddenly, I realized I wasn’t quite the weirdo I thought I was, and that there were lots of other people that feel the same way I do! I knew there was a reason I loved teaching, but really loved my alone time. I love going to gatherings such as conferences, but like to retreat early. While I can still sometimes feel socially awkward in a room, it’s something that I don’t hang up on anymore either and get over myself. I have enough confidence (some of that has come with age too) that I just laugh at what a dork I am, which allows me to relax and have fun being silly.
I also understand I need more self-care with recharge time. When I have a speaking engagement, I do a lot of mental prep, and reward myself with alone time. Having the explanation made it all fall into place, and made me give myself a little grace in certain things, and realized I need to push myself in others that go against the innate introverted part, and the feelings where I don’t quite fit in.
Check out how to paint a DIY abstract painting here. Here’s the thing, we are all good exactly as we are, there’s no one right way to be: introvert, extrovert or ambivert, because it makes the world go round. It’s good that we aren’t all the same. How boring of a world would that be? And, because I need someone else to stay late, so it’s not weird that I leave early. So what do you think? Are you an extrovert, and introvert or an ambivert?
The post Are you an extroverted introvert? appeared first on Jennifer Rizzo. from https://jenniferrizzo.com/2019/04/are-you-an-extroverted-introvert.html
0 Comments
Just like you, I love a good furniture before and after! I have a Painted Kitchen Table Makeover to share with you from a recent project. We have a design client at the shop that I’ve been working with to restyle and redefine her home, including updated lighting and furniture. One thing we knew needed to go was her old kitchen table. It was actually the first table they bought 20 years ago. It was a good quality, but the shape wasn’t very efficient for their family,or the use of the space. Also, there was a lack of lighting in the kitchen as well, which we fixed with a beautiful transitional chandelier.
Due to the layout of her kitchen we decided to have a custom kitchen table made. Unfortunately, when it was delivered, the finish and color were completely wrong. Since it was too much trouble to send it back and have it re-done, we decided it was time for me to dust off my bucket of furniture painting skills. I do love a good furniture makeover. One of my favorite makeovers was the time I did a dip-dyed effect on my kitchen table legs, and made over this dresser.
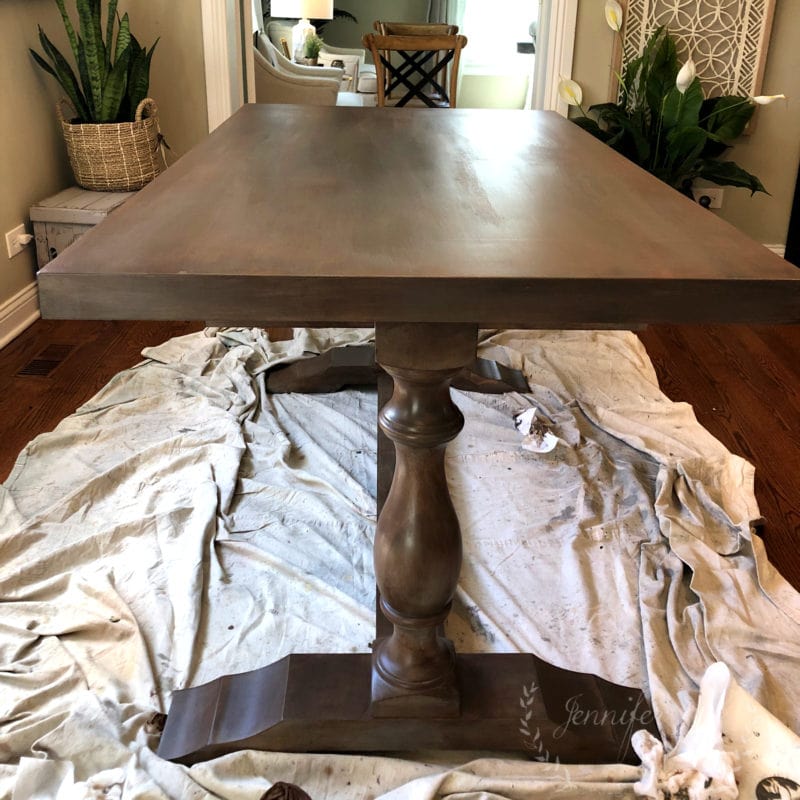
Even though the gray finish would be pretty in another setting, in this space, it was just too cool of a tone., and there was some patchy-ness in the final finish to the top. We decided when I painted it, to treat the gray as a base color, or undercoat for our painted kitchen table makeover. (This post contains affiliate links)
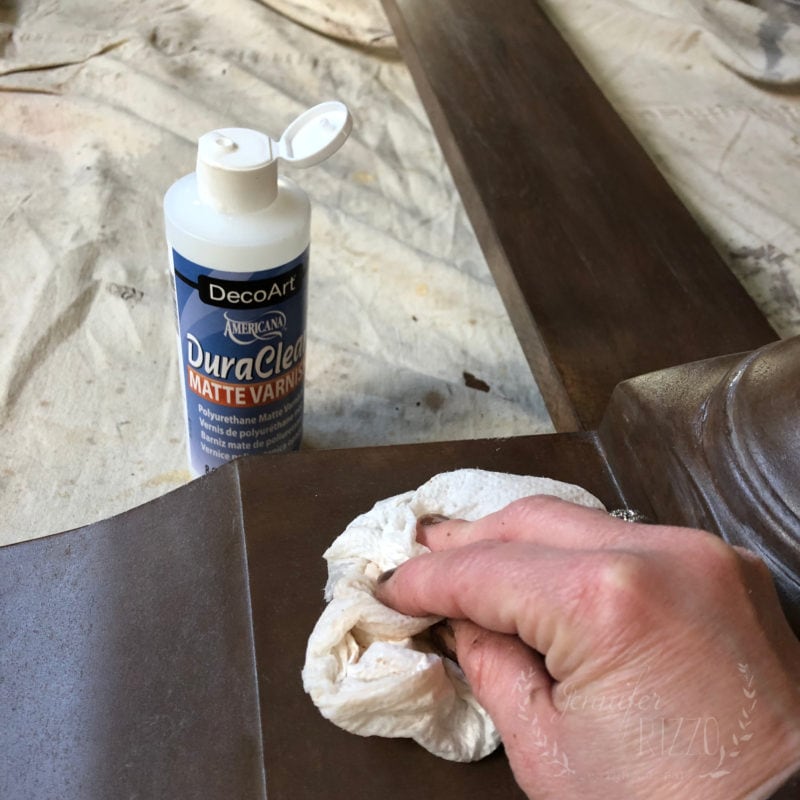
We decided to warm it up and give it a richer look so it fit better with the decor of the home. After prepping the piece (if you want to see the best way to paint furniture, check out this post here.) I started by layering by layering a warm, brown paint as a wash. Basically, I applied brown paint outdoor paint with a damp paper towel. It acted like a glaze to tone down the gray, almost like I did a gray-wash finish on this cabinet. You can see how the brown paint really transforms the color of the paint. The thing about using the paper towel instead of a rag is that it holds the paint differently. In fact, the nastier the paper towel gets, the better it works. The key is to not skimp, and use a good quality paper towel. The Cheap ones don’t hold up enough.
I should probably wear gloves when I paint, but I always forget. I’m lucky I remember to wear old clothing sometimes. Once I had gone over the entire table with the glaze, I started back at the beginning again, and this time went over areas with a darker brown paint with the same technique.
After that paint was dry. I used an old brush to lightly dry brush on a white paint to add a wood grain-ish texture to the top and sides of my painted table.
In areas where I thought the white was a little too bright, I just went over them with a little bit of the original brown color.
Once that dried, the table was ready for some sealer. Since the paint already has sealer in it, I just used a basic varnish for an extra layer. Here is a great post on whether to finish your painted furniture with a varnish, or a furniture paste wax.
I and the homeowner both were very excited at the transformation. The table had stuck out like a sore thumb before, and now it blends seamlessly, and looks like it belongs in the space. The chandelier just makes it look even better (find it here.). There is still a little bit of the gray undercoat that pokes through, but that’s OK. As time goes on, and it gets used, it will add to the character of the table.
The post Painted Kitchen Table Makeover appeared first on Jennifer Rizzo. from https://jenniferrizzo.com/2019/04/painted-kitchen-table-makeover.html I’m a big believer in the power of paint as the great transformer. I had an old wood and metal bench that while it structurally made it through the hard winter, it didn’t look too pretty! It was due for an outdoor bench makeover.
I have to admit, I wasn’t sure how well it was going to clean up. Even though the wood was bad looking, it was still solid. (This post contains affiliate links) I used DecoArt’s Curb Appeal in Hampton Blue, and Outdoor Living Paint in Picket Fence to paint my outdoor bench.
The one thing I love about the Curb Appeal paint, is even though it’s formulated for doors and shutters, I think it still works really well on other outdoor wood and metal decor and furniture. I have also used it on chairs and tables. I also used a DecoArt Greek Key stencil to makeover the seat area.
You can see the full tutorial and transformation here on the DecoArt blog.
The post Outdoor Bench Makeover appeared first on Jennifer Rizzo. from https://jenniferrizzo.com/2019/04/outdoor-bench-makeover.html In designing the window display at the shop, in my trio of GIANT vases, I wanted to make a mod cardboard vase. If you didn’t see construction of the first vase, you can see it here.
I started making vase number 2 by making a paper template, and then tracing. Which is what I should have done the first time! It was much easier to get matching sides that way. I wanted the shape to be somewhat classic, so I could have fun with the paint. (This post contains affiliate links)
I made the sides thicker than the last vase, and bent them to follow the curves of the template.
I found it helped to pre-bend them to improve their flexibility. I taped them on the inside with wide making tape.
After taping the top on from the outside, I glued paper over the top. After trying different techniques, I found it was easiest to glob the glue on, and spread it with another piece of cardboard.
When applying the paper, I found it helped to press it smoothly down and try to get as many air bubbles out as possible. To get the paper to adhere around the edge, clip the paper.
Once the paper was on, I was finally at the fun part of painting! I loved the idea of using fresh colors like lilac paint
To give it a flecked, textured look, I added a little water to a dark brown acrylic paint
Let one side dry before doing the other, other wise your flecks will smear. Once you finish the second side, glue the base of the vase on!
The second vase was so much fun to make, I really took a chance with the third one with construction! In the next post, I’ll show you how I put that one together!
The post Mod Cardboard Vase appeared first on Jennifer Rizzo. from https://jenniferrizzo.com/2019/04/mod-cardboard-vase.html Raise your hand if you love free art…I know I do! I am excited to share this free abstract art printable with you! When I first started blogging, it took me a very long time to identify myself as an “artist”. I knew I was a mom, a wife, and I liked to create, but it seemed like a big reach to call myself an actual artist. Even though I loved to paint, and draw, it wasn’t something I had gone to school for or gotten a degree in.
The first time I referred to myself as an “artist” I felt like I was lying. The words felt so foreign rolling off of my tongue. I think I was almost afraid if I said it, that someone would call me out, and think I was being silly (A few years ago, I realize it’s actually a real thing called “impostor syndrome”, and many of us feel that way all of the time, in all kinds of different ways.). Honestly, I was relieved when I realized that it was ok to identify myself with something I do, and fully embrace it.
In exploring all kinds of art techniques and mediums in the last few years (like this abstract agate paint techinque, or this way to paint with a putty knife.), I found one thing I really loved was painting abstract art. I get inspiration and colors from a lot of flowers in nature, like the greens and pinks in these snapdragons.
While I really love still-life, sculpture, design and pattern, abstract art has a special place in my heart because there are really no rules. It’s all about what you like when the paint goes on the canvas…and if you don’t like it, it can be fixed. Acrylic paint is very forgiving.
While I love painting abstract art, the best is when I get to teach it. I love the looks on people’s faces in workshops when they put paint to canvas, and see how freeing it is. This painting actually started out much darker, and while I love it, I ended up painting over much of it with white paint, and I love it even more! It’s perfect displayed on my faux mantel with vintage brass candlesticks, and all of my plants. It feels very springy and fresh to me.
Just right click on the below image to save and print.
You can print this on regular card stock, it would make lovely note cards. It would even be nice for a background for mixed media art. If you really love this free abstract art printable , I would be thrilled if you would pin it to Pinterest so others can find it and enjoy it as well!
Make sure you don’t miss the other bloggers sharing their free printables below!
Ingredient Substitutions List by Ella Claire | Homemade Lemon Curd Labels by Happy Happy Nester | I’ll Wash You Dry by Zevy Joy | Plants on a Shelf Watercolor by Craftberry Bush
Vintage botanicals and butterflies by Town and Country Living | Kitchen Measurements by anderson + grant | DIY Linen Spray and Printable Labels by Clean and Scentsible | Colorful Painting by Jennifer Rizzo
Definition of Home by Home Made Lovely | Pineapple Print by Making Home Base | Home Sweet Home by Lolly Jane | Balanced Coffee by Taryn Whiteaker
Home is Where you Park it by Tidbits | Watercolor Lemon Series by The Happy Housie | Plants Grow Towards You by Nest of Posies | The Garden Journal by On Sutton Place
Semper Fidelis by Paint Me Pink | Feathers by Twelve on Main | They Broke Bread in their Homes by Live Laugh Rowe | Laundry Co. by My Someday in May
Watercolor Herb Prints by Nina Hendrick The post Free Abstract Art Printable appeared first on Jennifer Rizzo. from https://jenniferrizzo.com/2019/04/free-abstract-art-printable.html One of the fun things about owning a retail store (besides shopping), is that you get to merchandise the store, and create and design window displays. When we decided to launch Wild & Bloom, one of the things I wanted to try to tackle was creating DIY Giant Cardboard Vases for our window display. Every week, we have tons of recycling, so there were plenty of nice, sturdy boxes to choose from! While I did these on a really large scale, this would be a fun craft/decor item to make on a smaller scale for an upcycled craft or DIY pinata! If you need free boxes, always ask your local boutique or small store. There’s a chance they would be very happy to get rid of them! The first design I decided to tackle was a Giant Cardboard Chinoiserie Vase.
I knew I wanted to make three different shapes and sizes. The challenge was figuring out the shapes, and then breaking them down into the physical shapes needed to be to construct the vases. I could have made smaller ones first as models, but I am a go creatively big, or go home kind of project person ( or a make it more difficult for myself project person…). I like constructing things out of cardboard,and if you ever wanted to make a DIY pinata out of cardboard, this is project will probably give you some good, basic steps.
I’m going to share the easiest one first. I was going to share all three vases in one post, then I realized I had waaaay too many pictures and steps, so I’ve broken it down into three different posts for you. I first found boxes that were on the thicker side, and that fit the length I needed.
After sketching out my shapes in chalk, I cut them out. I realized by the second giant cardboard vase, making a template on brown craft paper first, and then transferring the image was much easier.
After my pieces were cut out, I started assembling. The first vase consisted of two vase-shaped panels, two long stripes for the sides and a flat base. That’t it. I first taped them in place along the edges, then glued them together. The hardest part was taping the final piece on.
To give them a smoother surface,hide the tape and make them sturdier, I covered them with white tacky glue and brown craft paper.
After the glue dried, it was easy to trim it along the edges. I then glued the base piece on so it would stand upright. Once that dried, it was ready to paint.
After a base coat of white acrylic craft paint over the top, and I started the fun part of decorating them! There was some slight crinkling on the paper on the first vase, but I didn’t mind it. I think it adds to the texture. I applied the glue differently on the second and third vase, and the crackling was much less.
Since blue and white chinoiserie is coming back in style, I wanted to give it a new,modern twist by painting tropical boho plants and leaves on the side. I used inspirations such as fiddle leaf fig,palm, and monstera leaves.
I was so excited with how the first giant cardboard chinoiserie vase turned out, I couldn’t wait to start on the second one with a different vibe. I also was inspired to use the modern chinoiserie pattern on fabric, and on pillows in our on-line store as well as a part of our Wild & Bloom collection. I’ll have post for vase number two up next. That one was fun, because I went all mod on the design, and played with splattering paint!
The post Creating Giant Cardboard Chinoiserie Vase for a Window Display appeared first on Jennifer Rizzo. from https://jenniferrizzo.com/2019/04/creating-giant-cardboard-chinoiserie-vases-window-display.html Have you ever made glue resist art before? If you aren’t familiar with glue resist, it’s a technique using a medium such as glue or wax on fabric or another surface to cover the bottom layer. With resist painting, you then apply a layer of resist, then another layer over it with another medium such as paint, or dye. Then, you remove the resist medium to reveal the layer underneath. This is often used in silk scarf dying, and in watercolor (on paper) with a material called frisket. Resist art is fun, because it really opens up possibilities when you want to bring another layer of color in, or even just negative white space.
(This post contains affiliate links)
As well as white craft glue as a resist for this glue resist art wall hanging project, I also used the HomeRight Super Finish Max
This project is made with just painter’s tarp and white craft glue, so the best part is, it’s an easy project…I always love a good white glue craft project.
Use the tip of the glue container as a drawing tool. Since I was making mountains, I let the glue flow out and make some wavy, free-form lines. Once the glue was ready, I laid it flat in my Medium Spray Shelter
I loved using my Super Finish Max
Once you remove the glue resist layer, you get this really cool look! I am excited to break this out for other projects, including DIY fabric with fabric paint.
If you liked this project, you might also like this DIY stenciled art project, and also how to do this DIY abstract painting technique.
This post is sponsored by HomeRight, opinions are entirely my own. The post Glue Resist Art Wall Hanging appeared first on Jennifer Rizzo. from https://jenniferrizzo.com/2019/03/glue-resist-art-wall-hanging.html One of the thing I love about co-owning my own retail store is the possibilities. One of the possibilities we had talked about was doing a spring collection that would allow us to guide not only our spring buying, but allow me to go deeper into my experience with art and product design. After brainstorming, we decided to capture the feeling of spring. The freshness, and the sweetness, and abandon that it emerges as everything grows. We landed on the name Wild & Bloom, and started building everything around that theme. Of course my favorite part is the Wild & Bloom bunny. He’s(or She’s) just the cutest!
I’ve been working on window display for a while, which if you’ve followed my Instagram stories, you saw my giant vases with pampas grass plumes for the window. If not, don’t worry! I will be following up with a post for you to see my process, which building cardboard displays from our recycled boxes was so fun and interesting to try for the first time!
Last night, we hosted a VIP event in our store, and it was so much fun, and it was so awesome to be able to unveil our vision!The best part is, if you aren’t able to stop in the store in person to see the collection, you can find it here in our on-line shop!
I loved being able to pull out my paints, and really dive into what Wild & Bloom meant. I love spring so much, especially after such a long winter. I can’t wait to start my seeds, and I get so excited when I see all of the rebirth happening around me! I poured that into my artwork, and we used that as a guide as we picked out coordinating decor, candles, jewelry and apparel items.
I love Wild & Bloom, and I am excited to start thinking about our next collection, and how we can make that come alive in our store. For those of you who don’t live close, you can shop Wild & Bloom on-line too!
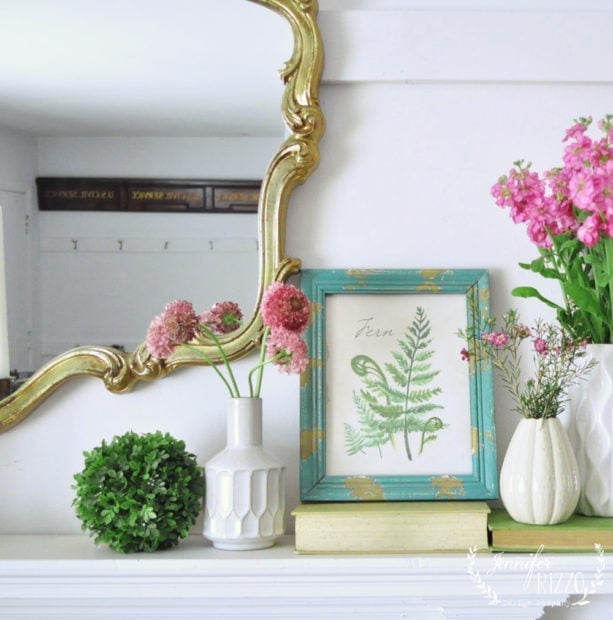
The post Wild & Bloom 2019 Spring Launch appeared first on Jennifer Rizzo. from https://jenniferrizzo.com/2019/03/wild-bloom-2019-spring-launch.html Are you as excited as I am that spring is almost here? We finally have turned the corner weather-wise and the sun is out! I love seeing all of the spring bulbs poking their little noses through the ground, knowing that in a few weeks, we are going to have tulips, hyacinth’s, unfurling ferns, and other lovely smelling blooms! I’m joining a group of talented bloggers to celebrate, and give you some goodies hosted by Ella Claire! We are all sharing free printables with you perfect for your spring decorating, and I have a Free Botanical Fern Printable for you for personal use!
I’ve styled mine in a distressed blue frame from this project, with white vases, and some pretty flowers from the grocery store. I love having fresh flowers and plants around the house, especially when it’s so gray outside. I’ve been really inspired by these houseplant books to add even more into my decor.
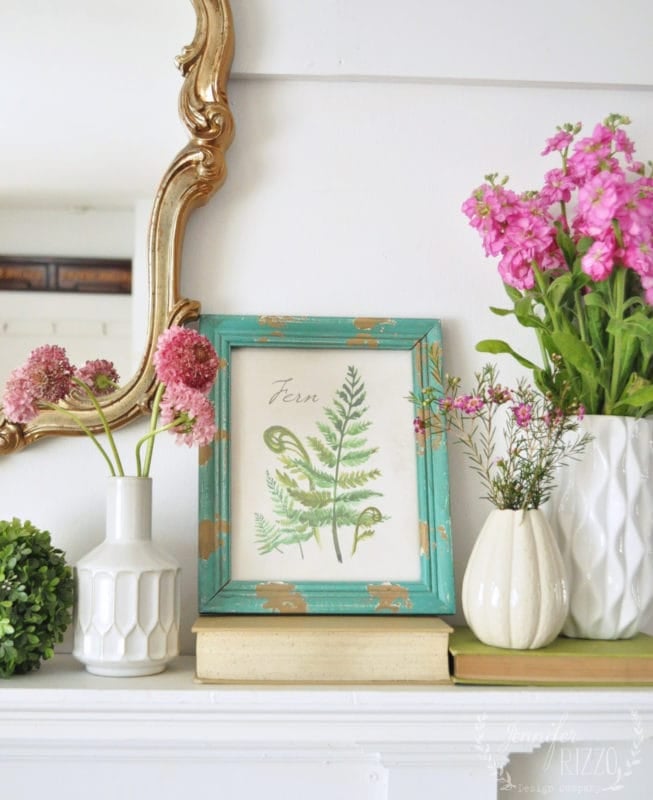
It’s an image I collaged of my own watercolor and digital artwork. I’ve been doing a lot of painting lately to get product ready at the store for our spring collection launch. I’ve also been preparing to teach a Santos Doll sculpting workshop weekend (there are still a few spaces left!).
I had my image printed at our local UPS store on regular 8 x 11 white cardstock. It was less than $1.00, and I just e-mailed the jpg to them and picked it up when it was ready. I find our local UPS store is a great resource for local printing needs, and for a quick project like this, it’s so much easier than trying to feed card stock through my printer at home, or wonder if I even have cardstock.
Just right click to save the image of this free botanical fern printable, and then scroll down to visit the other bloggers.
Make sure to visit below to see the other free printables!
Set of 3 Handpainted Spring Watercolors by Twelve on Main | Botanical Spring Flowers by Live Laugh Rowe | HOP to it Spring Printable by Nest of Posies | Spring Nest Watercolor by Nina Hendrick
Spring Herbs by My Someday in May | Series of Four Watercolour Art by Happy Housie | Black and White Florals by Zevy Joy | Leaves and Mushrooms Wood Slices by Town and Country Living
Feather and Nest Spring Towel Template by Craftberry Bush | I Love Paris in the Springtime by So Much Better with Age | Hurry Up Spring! by Home Made Lovely | Vintage Amber Bottle Label by Blesser House
DIY Easy Cupcake Wrapper by Happy Happy Nester | Fresh Flower Market by Clean and Scentsible | Bright and Beautiful Watercolor by Maison de Pax | Sunflowers and Butterfly Muffin Wrapper by Paint Me Pink
Welcome Spring by My Uncommon Slice of Suburbia | Spring Bingo Cards by My Sweet Savannah | ‘Happy Easter’ Bunny Tags by Boxwood Avenue | Spring Spring Spring by Taryn Whiteaker
Fern Botanical by Jennifer Rizzo Design Co. | Believing in Spring by anderson + grant
The post Free Botanical Fern Printable appeared first on Jennifer Rizzo. from https://jenniferrizzo.com/2019/03/free-botanical-fern-printable.html Have you ever embroidered? Regular embroidery is not something I’ve done a lot of, but I recently came across punch needle embroidery and was intrigued. I decided it was something I could tackle, and immediately ordered a kit and a bunch of beautiful thread. Well, after stabbing myself twice, and drawing a little blood, I realized there is a bit of a learning curve to it. It’s a good reminder that I don’t have to be a rockstar in every arena of crafting (as hubby reminded me… there was the great macrame debacle of 2016.). It is something that I am going to continue to practice. In the mean time, I wanted to share a project with you that will give you the look without physical injury…punch needle embroidery painting.
It’t super easy, and all you need for punch needle embroidery painting is:A thin-tipped paint brush, craft paint, some paint supplies like water, and paper towel, a surface to paint on such as a wood slice, and you are ready to go!
Start the project by painting the wood slice with gesso. I used DecoArt’s Chalky Gesso in white to give it a base coat. This helps the paint grabs the surface, and the “stitches” pop from the background.
Once the gesso is dried, lightly sketch your pattern onto your surface. I used DecoArt’s Americana Acrylics in their new colors Vintage Pink,Berry Cobbler,Golden Yellow,Green Lagoon, and Mermaid’s Tail. The trick to making your paint strokes look like punch needle embroidery is to use a thin brush. When you touch the end of the brush onto the surface, push down slightly to lengthen the stroke, and then lift up right away. This will create the “stitch”. It’s also important to have the brush strokes moving in the same direction like how real embroidery does. Finally, when doing longer running stitches, that each end touches. This will give that embroidery-like look.
Dip the tip of your paint brush in the paint an off-load a little paint onto a paper towel so it doesn’t have a “globby end”. Use a practice surface like a piece of paper. It’s always a great way to test your strokes out before jumping right onto the surface of your project.
Start creating “stitches” with your brush. When painting, turn the wood slice instead of your arm or the brush, to change direction on the brush strokes.
I found it helpful to work in different sections when I needed to change color, and then return to an area once it was dry. This will help to keep the punch needle embroidery painting stitching from smudging. Also, let the paint run a little low on the brush before reloading to get color variations and tones in your pattern.
It’s also OK to have some white space between the stitching, but you don’t want huge gaps. You can also go back and touch up in areas where there is a little too much background showing through… but less is better than adding too much, and making it too solid.
I’m happy that punch needle embroidery painting does look like stitching! I’m excited to play around a little more with this technique on fabric with fabric paint for an “embroidered look”.
This post was sponsored by DecoArt, opinions are entirely my own.
The post Punch Needle Embroidery Painting appeared first on Jennifer Rizzo. from https://jenniferrizzo.com/2019/03/punch-needle-embroidery-painting.html |
About UsHi Im Veronica. Im a mum of two. Living in the UK. I absolutely love dressing my kids up in stylish little outfits and showing them off around town. When I'm not running around town with my kids, I'm shopping or designing my flat or someone else's. Part time interior designer and self appointed home decor expert. ArchivesCategories |


 RSS Feed
