The one rule that I love most about abstract painting, especially when I teach/lead a workshop on it, is that there really aren’t a lot of rules. For me,it isn’t about having to draw the perfect line, or make it look exactly like a tree… It’s about painting what you feel, and what you see, and if you like it or not. The scariest part of abstract painting is having to get over is putting that first stroke of paint on the canvas. My DIY abstract painting tutorial today is more about giving you the direction, and guideline, and how to use an abstract painting technique that involves layering paint. We are also going to have fun using an unconventional painting tool too, so pull out your drywall putty knife, and get ready to paint!
I’m using a wood framed board canvas, but this technique could apply to a regular canvas as well. For this project, you’ll need: A large flat brush, a 3″ drywall putty knife, paper towel, canvas, palette or plastic plate
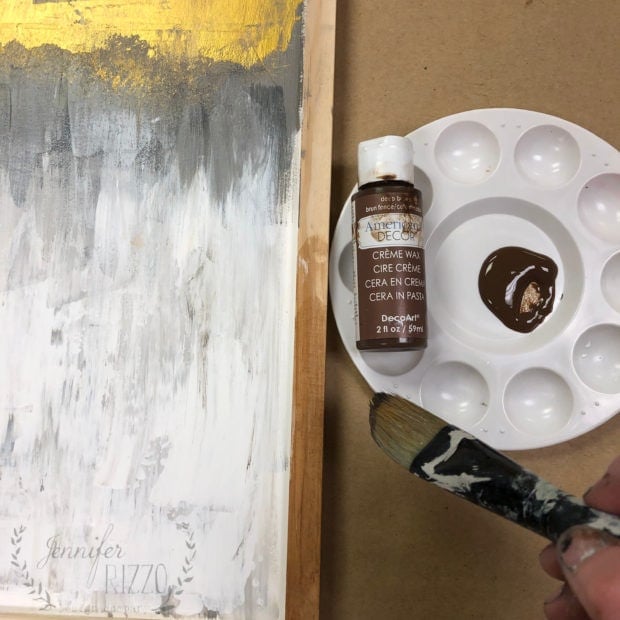
DecoArt Premium Acrylic paint in Titanium White,Warm Grey, Carbon Black, Burnt Umber and Cadmium Yellow Hue, Extreme Sheen in 24K Gold, and Creme Wax in Deep Brown ( if you are going to stain the frame.) This project would also be a good way to use this kind of paint. If you want to add a frame in an inexpensive way to your canvas, you can see how to do that here. Start by painting a layer of Titanium White on your canvas. This will ensure a smooth glide for your future paint layers. This is a good idea to do even if you buy a pre-gessoed canvas.
Paint short brush strokes of black, burnt umber, gray and yellow, covering the canvas. This is probably going to look pretty bad. It’s ok, it’s just a base layer. We are going to cover most of it up, I promise, so don’t panic.
After your base layer is up, use a large brush to make downward strokes towards the middle. Turn the canvas over when you want to do the bottom edge. You want your strokes to be slightly patchy, so the colors underneath peek through a little.
Once you have the coverage you like with the white paint, next use the warm gray, and your large brush to paint a line straight across the middle of the painting. Use short downward strokes, moving across the canvas horizontally.
Mix some black paint in with the Warm Gray paint, and brush on some sections of a darker gray over the lighter gray. When I painted on my gray line, I made one side wider than the other. That was just a design choice. You can keep it the same size if you want all of the way across. Here’s where you get to play with your drywall putty knife.
Pick up some white paint on the edge, and with a downward motion, apply it to the canvas, stopping at the gray line.
You should get a really patchy , organic kind of pattern, and that’s just what we are going for! It’s that look for incompleteness that makes this painting of this DIY abstract painting! Flip the canvas upside down to work from the other edge.
Once your white is applied, take a brush and stipple some gold on over the middle of the gray, using a light, pouncing motion, moving across the canvas.
Once your stippling is done, use the putty knife again to apply the gold paint in a random way across the line, right in the middle.
It almost goes on in a blobby way, and I like that. Once you have your paint on, and you like what you see, let dry. Less is more when adding paint.
I wanted to give the frame a natural feel, with a little color, so I used Americana Decor Creme Wax. It let the natural wood come through, and gave it a rich finish that paint wouldn’t do.
After applying it with a brush, I used a paper towel to remove the excess and let dry. Once the painting is dry, just put a sawtooth hanger on the back to hang, and enjoy your artwork! When I staged the picture, I couldn’t decide which lamp to use, so I pulled three different lamps from around my house to see which one I liked best.
I tried a wood lamp first, but I felt it was a little tall, and I couldn’t really see the painting.
Then, I tried a slightly smaller white lamp, but it still felt tall.
I finally decided on this small black lamp from the kitchen, I felt it showed the painting off the best, and was the right scale. I hope you enjoy diving into DIY abstract painting! Let me know if you try it, I would love to see your painting! If you liked this tutorial, you can check out this tutorial on how to paint an agate-inspired painting.
This post is sponsored by DecoArt, opinions are entirely my own.
The post DIY Abstract Painting appeared first on Jennifer Rizzo. from https://jenniferrizzo.com/2019/01/diy-abstract-painting.html
0 Comments
As the holidays slowly melts into late winter, I am really excited about the new Makery workshops we are offering! We started off in early January with some creative, new year experiences! We had a a vision board workshop, and a paint your word workshop (my word of the year this year is INTENTION.) so you could start the year off inspired. Now that we are moving further along, we are really concentrate on exploring creativity, and learning new skills! Here are some of the workshops we are going to be offering in January:
I am excited to be teaching this GIANT yarn wall hanging workshop! It was so much fun to make. It’s a very satisfyingly fun and messy time. We are going to explore not only yarn knotting, and tassel-making, but also dip-dying yarn. I love a good dip-dyed project!
I won’t be wearing that cute denim jumpsuit from Target in the above picture for the Macrame-ish workshop. We are going to get MESSY, so you’ll see me in my messy paint clothes. This is a longer class, so we will have some snacks provided too.
You know me, if I can get some paint on myself, I will!
Here’s a fun video about the Makery Macrame-ish Workshop! I have the registration page link below if you want to check out the times and availability.
We also are going to be offering a furniture painting workshop. If you can carry it in, you can paint it, and all materials are included!
We also have a super-cute ruler painting workshop.
And, remember that pine forest, winter painting I just did? I am going to be teaching a class on painting it! It will be a smaller 11 x 14 version on canvas board.
We’ll also go over shading, shadows, highlighting, and how to create a washed-moody backdrop with blues and grays. We’ll use a flat canvas board so you can frame your artwork when it’s done. You can check out the rest of our January Makery workshops here. Our February schedule will be going up soon, and we have some fun workshop weekends coming up this year too! The retail portion of our store is also starting to get all kinds of fun new products in too. It’s nice for everything to have a nice refresh in the new year!
The post Upcoming Makery Workshops appeared first on Jennifer Rizzo. from https://jenniferrizzo.com/2019/01/upcoming-makery-workshops.html Hi everyone! Happy New Year! We closed the shop for the week between Christmas until just after the new year. I have to tell you, it was pretty amazing. I ate a ton of food. My family and I put together a brand new puzzle, only to discover it was missing one piece at the end (insert mad face here.), and just hung around. I did sneak out one day to the closed shop, to nurture my creative side, and work on a new pine forest acrylic painting. Even though I love design, sculpture,ceramics, and just plain making stuff, paint has always played a part in all of those. It’s probably why when I got back into creating, I was painting furniture, and murals. In the very beginning, I was making the most horrible looking mason jars, picture frames, and a few stuffed, felted snowmen ever. Don’t believe me? Here is a picture from one of my first craft shows :
Well, you gotta start somewhere, right? So, if you are reading this now, and you want to dive into creating something, but are worried its going to be bad… That’s ok. Just start making things. The more you make, the better you get. Remember: we all start at the beginning. I really love putting paint to canvas, and working in acrylics and gouache. One of my main goals for this year is to dive back into canvas work, and start offering my paintings for sale again in the shop.
I decided to paint my pine forest acrylic painting over a simple picture I did for my holiday housewalk over my faux mantel. It was such a big canvas, I thought it was better to reuse it, rather than buy a new one.
I started by adding a layer of white acrylic paint over the top of the old painting. The hardest part is waiting for it to dry, so I can add more paint!
After I did a cover coat on the old painting, I did a quick layout painting over the top in my colors. I wanted to get my valley, and my tree positioning correct. I know there is a whole rule of thirds, but as someone who was never formally trained in art, I just kind of go with what is pleasing to the eye for me. I I decided I wanted to use shades of black, green, blues and grays for my canvas to give it a wintery feel. I used DecoArt Premium Acrylic Art paints for my canvas, but this is not a sponsored post.
After I did my initial layout, I added my pine trees using under-painting. It’s a technique I use a lot. I like how it gives me a good, dark base to lay my lighter colors over. I feel like it enriches the colors painted over the top. This works well in acrylics, but not so much in other mediums like watercolor, or gouache. I don’t work in oil paint, so I am not sure if it’s used in that kind of painting at all. Maybe some of you more versed in oils would know?
I added snowy branches by using a round brush, touching the tip fill of white paint, and adding gentle pressure downwards. After the snow, I added some simple shading to the bottom of the trees.
I have a tutorial in this post on how to paint a winter scene, which includes a basic pine tree. You can also see how to paint a birch tree here, and an agate pattern here.
Once it was dry, I added it to my winter mantel decor. I kept my deer up, and my felt garland from Anthropologie, and added a few birch logs and candles.
The snowy canvas looks nice above our faux fireplace. It gave me such joy to take the time to really create! I hope to have a pillow or two of it available in the shop soon, I just need to photograph it with my big girl camera, so I get a good resolution for prints!
The post New Year New Pine Forest Acrylic Painting appeared first on Jennifer Rizzo. from https://jenniferrizzo.com/2019/01/new-year-new-pine-forest-acrylic-painting.html The last time our main bathroom was painted, was when we gave it a big makeover in 2012-ish. At the time, white walls were starting to come into their own, and lights grays and blues were also starting to slowly creep their way in, as everyone moved away from the traditional tans and reds. We had just put in a new floor under duress (leaking potty), and picked everything on the fly, including floor tile, and paint colors. Lately, I’d noticed the walls were starting to look a bit dingy, and I was just ready for it to be updated. I had envisioned our light space darker, as a bathroom makeover with dark green-blue walls.
Part of the makeover would also mean it was time to change out the towel bars, and shower curtain. Our lighting is going to wait a little while, I’ll share that with you when I find it. There was a little prep beforehand to fill and spackle the old towel bar holes, and some scrubbing and wall cleaning. With all girls, there are a lot of hair products flying around that room, that seem to end up on the walls. I swear, I am over dry shampoo with them. (This post contains affiliate links, and is sponsored by HomeRight) For me, that new color meant dark and dramatic. I did a post on dark wall colors here, and how they were going to be trending, earlier in 2018. I even painted my hutch a dark green color. Dark colors are finally starting to creep their way into decor, and I’m ready to embrace it a bit. I was looking for a deep paint color that had a “dusty” overtone, and would be a green, with a blue undertone. I had the “ideal” paint color in my head. Whether it was going to be a real color that existed, or if I was going to have to play with the colors to get a custom mix or not I wasn’t sure of. It took sorting though multiple fan decks, and luckily, only two sample cans to get it right.
I tried a color from Benjamin Moore called Blue Slate at first, and it was just too blue, even though it looked very green on the paint strip, and even until it dried on the wall (this is why sample cans are so important!). My second color was the winner! It’s called Calico Blue #707. It’s a gorgeous green, with a warm, blue undertone. In fact, during the daylight it looks green, but at night with our incandescent bulbs, dark blue. I love the effect it has! It’s gorgeous! Since our bathroom is so small. I used the HomeRight Quick Painter Pad Edger with Flow Control to cut in all of my edges, and even do the smaller parts of my wall.
It was so nice, because the edges ended up super clean, and I didn’t have to drag out the huge roller and tray. It only took me about 3 hours to paint the entire room, even with a second coat. You can see how easily I used the Quick Painter in my HomeRight post here.
I am love how it looks, it’s like it became a bathroom for grown ups! And, I love how paint is such a great budget makeover tool. It can change everything, in just a few hours, for under $40!
The botanical bird image in a frame was a thrift store find., and I found the shower curtain at Target, but you can find a similar one here. The dark green towels are Nate Berkus for Target. The towel bar is from our shop, The Collective lhe, and so are the small, gray and white vase, and bath products. You can find a similar large white vase here.
It’s such a difference. I just freshened up the white paint on the wainscoting, and trim, with Benjamin Moore Simply White.
With the new paint trends of 2019, I think you are going to see it move farther away from light colors, and more towards contrast with dark against light. And, more like my bathroom makeover with dark green-blue walls, there will be a moodiness that creeps into decor for 2019. Even though it’s dark, it’s going to feel very fresh.
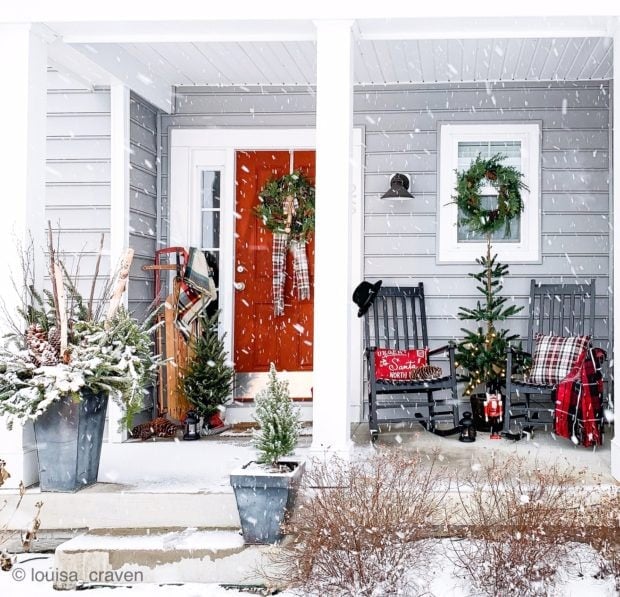
This post is sponsored by HomeRight, opinions are entirely my own The post Bathroom Makeover with Dark Green-Blue Walls appeared first on Jennifer Rizzo. from https://jenniferrizzo.com/2018/12/bathroom-makeover-with-dark-green-blue-walls.html Hi everyone, we are back today with Louisa Craven’s beautiful home! Today I am sharing her gorgeous Christmas kitchen and living room! One thing I do love about social media, is being able to find new sources of inspiration every, single day. When I saw Louisa’s home, I just knew you would love it!
I love how you can look straight through Louisa’s kitchen, and see right into the morning room we got a peek at yesterday. I adore how every part of her home has been touched by Christmas!
I love the cone lighting over the island, and the wood chairs against the off-white cabinetry. I think cone lights are my new favorite, even though I love our new lighting in our dining area with the birch tree wall mural.
Her living room is so pretty, and cozy, it makes me want to walk in and sit right down. I love the combination of red and gray, with all of the leather and greenery (especially the asymmetrical greenery!). I also spy a cowhide rug, which I love a good, layered rug.
The dark gray fireplace really pops against the white walls. The open shelving makes the room feel light and airy as well.
The wood decor is a nice, rustic, contrast in her Christmas kitchen and living room.
I want to thank Louisa for letting me use her photos, and for welcoming us into her home!
The post Gorgeous Christmas Kitchen and Living Room appeared first on Jennifer Rizzo. from https://jenniferrizzo.com/2018/12/gorgeous-christmas-kitchen-and-living-room.html Every year around Christmas, and after the Holiday Housewalk, I like to feature someone who was not on the walk who has a beautiful Christmas home tour. I am so excited to share this house because I think her home is amazing! I started following Louisa Craven on Instagram, and I love how she decorates, and the touches she puts into every space! Every room has a beautiful rhythm to it, and is like looking at a magazine! I was going to share her home in one post, but her beautiful Christmas home tour is so amazing, I’m going to break it up into two days. Louisa lives in West Virginia with her husband, and is the mom of grown children. She has lived in Germany, and traveled all over the world, before she settled back in the states. Many of her gorgeous vintage finds are from an antique market in Tongeren, Belgium! I’ll start at her amazing front porch, and we’ll welcome ourselves inside to see her morning room.
How lucky that she has snow too! I’m not a huge fan of snow, but it’s nice to have it for Christmas!
I love this gorgeous pine and birch planter idea! What I love most is that Louisa created her planters by using free clippings from the hardware store, and added eucalyptus to her wreaths and greenery. She was inspired to decorate this year from her holiday pillows, here’s a little bit about what Louisa has to say about her holiday decorating style: “I love and appreciate so many different design styles, but my Christmas decor tends to be little more traditional. My go to color every year is festive Christmas red. I love it!
I try to incorporate many of my vintage finds and family heirlooms into my holiday decor each year.
The nutcracker is an authentic German nutcracker that I inherited from mother.
That and the red German Christmas Tree dishes. I love the wonderful memories attached to these pieces and can’t wait to display them each year.”
I love the frosty red berries on the tree, and all of the red. It’s so merry and cozy! I would love to sit in that room all day long. Tomorrow, I’ll have more of her beautiful Christmas home tour to share including her gorgeous kitchen, and family room to share with you!
Louisa has been also so kind to share some of her shopping resources with us! Throw -on the chair Home Goods The post Beautiful Christmas Home Tour appeared first on Jennifer Rizzo. from https://jenniferrizzo.com/2018/12/beautiful-christmas-home-tour.html It’s the reveal day, and I am so excited to show you my Birch Tree Wallpaper Mural!You can see how I started here by stapling bedsheets over my beadboard wall in our dining area. For those of you who aren’t familiar with my home, we live in a 1960’s era split-level that is about 1,200 cozy square feet. Our dining area is directly off of our kitchen, as we have the typical, first floor kitchen-dining area-living room layout. Over the last few years, our dining area has had many looks. I have a few below, before the big reveal.
The one thing we are lucky about with our dining area, is that there is an extra bump out behind where our one car garage is, so it gives us an extra 6 foot x 11 foot area. A few years ago, as my handmade business was growing, we added a built in bookshelf to divine the room, so I had an area to work in. Slowly, it grew so I could have more space to work.
Now that I co-own a retail store with a Makery in it, most of my creating is done at work, and we are able to re-purpose that area into a small office (some day I’ll share that space with you.).
We also had a lighting dilemma a few months ago. Our rewired vintage chandelier started blowing all of the circuits on our first floor. After a visit from the electrician, it turns out that our chandelier was a few switches-on away from catching fire. It took forever to find a light I liked, so we prepped food by a lamp for a while. It was very bohemian. I finally found a light I liked, but not for the kitchen. We ended up swapping the dining room light into the kitchen, and putting the new light into the dining area, which then prompted me to give the entire room a much needed makeover! Are you tired yet? I know I am !
So here it is (We are also adding a vintage door on barn door sliders, so I’ll have that to show you soon too.)! I still need to paint the trim a brighter white, and add some molding, but I will finish some of that after the sliding door goes up.
Love, love , love how it turned out! And, I really adore how it brings the outside inside. As a nature, and botanical lover, so bringing the outdoors in, in the dead of winter is important to me.
The mirror was in our bedroom, but the round shape seemed to go perfect with the new lighting. The total cost of the project including the sheets was about $50, and only because I had to buy a new staple gun when I lost my old one. Do you want to paint your own mural? I have a tutorial here on how to paint birch trees here. Here’s a before and after for comparison:
We are ready to make the little room a little more usable too, and add a real door in place of the curtain that has been there for years. We found a great old door at the Habitat for Humanity Restore near us, and we are putting it up with barn door hardware.
We are in the process of hanging the door now, so I can’t wait to show you how it’s changed the entire space!
The post Birch Tree Wallpaper Mural appeared first on Jennifer Rizzo. from https://jenniferrizzo.com/2018/12/birch-tree-wallpaper-mural.html A few years ago, we put up a bookshelf to divide our dining room, to make a small studio space as my Etsy and wholesale business grew. At the time, we backed the bookshelf with beadboard paneling. It was all the rage at the time, I even had beadboard wallpaper on some of our walls. Lately, it’s felt time for a change, and I started falling in love with the idea of birch tree wallpaper on that wall. I started pricing it out, and it was so expensive! I just couldn’t swallow the idea of spending almost $300-$400. When I started blogging, I had a mural and furniture painting business. I thought it was time to dust off some of my old skills, and paint a birch tree mural on our dining room wall. Here’s a peek at what it looked like earlier this year.
The one thing I needed to do was come up with an inexpensive way to cover the wall without a huge expense.The beadboard has a ridged surface, and would be impossible to paint on smoothly. Regular canvas was crazy expensive per yard, and I needed a lot! After looking at different options, I decided to staple bed sheets to the wall, and use it like a canvas.
After cutting king-size sheets to fit the wall, I used a staple gun to adhere the sheets, pulling them as tightly as I could.
Now, a more patient artist would have gessoed or primed the sheet first. I am not that patient of an artist. Once they were up, I immediately used craft paints to start painting my birch trees (If you’re interested in learning how to paint birch trees, you can see this post here.).
Since I did not really prep my surface properly (like a good artist should), and the sheets sucked up slightly more paint than a regular wall or canvas, I needed a few more bottles of paint than I originally thought. I used Americana acrylic paints (affiliate link) in Warm White, Soft Sage, Sand Gray.
The best part about using acrylic craft paint, is that it dries right away.
I kind of love that by painting the birch tree mural on our dining room wall is kind of like coming around full circle for me. Painting murals and furniture was such a huge part of how I got into my creative business. I’m so excited with how it looks, and I can’t wait to share the final result with you!
This post is not sponsored by DecoArt, even though I used their paints. The post Painting a Birch Tree Mural on our Dining Room Wall appeared first on Jennifer Rizzo. from https://jenniferrizzo.com/2018/12/painting-a-birch-tree-mural-on-our-dining-room-wall.html Last week, I shared my kitchen, dining area, and living room for the holiday housewalk. I wanted to give you a closer look at my open shelving on the right side of the kitchen, above the painted buffet, and how I added some holiday touches. When we remodeled our kitchen in 2010, we took out the original cabinets that were there. They were really just a place where clutter gathered. We then had a hutch there, until we replaced it with my Gram’s buffet. That’s been the best move so far. It’s been great storage, and prep space for us.
We added the open shelving to that area a few years ago, after I painted the buffet. For a long time, we had a large mirror there. I loved the way it looked, but we really needed the shelves for some storage.
We keep our cookbooks, and baking supplies on the shelf, and some of our serving pieces.
In front of my large wood bowl, I put Santa, a reindeer, mercury glass ornament garland, and a fun sleigh,full of bottle brush trees, that I had on my mantel last year.
I keep our appetizer plates under a dome so they stay clean while were not using them. My kids put the dishes away. As you can tell, they either didn’t really care how they put them back, or were going for the Tower of Pisa look. If you ever come to dinner at my house, I am going to warn you now. They unload the dishwasher, so always double check your silverware, and glasses before eating.
I did add a few live sprigs of pine in vintage bottles. I love how the green of plants are a neutral color.
Under the open shelving is where we keep our coffee command center. That’s my first go-to in the morning before I even crack an eye open. I love my family like crazy-cakes, but they really need to not speak to me until I have that first sip of magic in the morning. I know many people are hesitant to remove cabinets for open shelving, but for is it was an awesome decision. It actually gave us more storage than having a ton of drawers and cabinets to shove things it. It actually made us use the space we had better,and I love being able to add some simple holiday touches.
The post Open Shelving Holiday Touches appeared first on Jennifer Rizzo. from https://jenniferrizzo.com/2018/12/christmas-shelfie-open-shelving-holiday-touches.html Hi Everyone! It’s that time of year again for the annual Holiday Housewalk Linky Party 2018 edition! This is one of my favorite parts of the housewalk, because it’s not only way for you to showcase all of your gorgeous holiday decorating, but it’s a way to find new homes for the housewalk.
Here are the rules: -Grab this button, it must be at the top of your post, and it must remain linked back to this post. -You must have a do-follow text link stating your are participating in Jennifer Rizzo’s Holiday Housewalk Linky party 2018 -You can link within another tour -Show your best decor! Natural photography lighting is best! If you are on Instagram, and not a blogger, you can be considered to be featured on my blog during the tour. Make sure to do an IG post with at least 5 slideshow pictures and use the hashtag #Jrholidayhousewalk2018 Some troubleshooting: -If you are having trouble linking, it may be because you do not have a backlink to this post. Also, some platform like Squarespace may not allow you to participate in link parties. -If you are unable to link, you can leave your link in the comments section. This link will remain open for two weeks. Any homes chosen will be notified in August of 2019, as space becomes available. I can’t wait to see all of your gorgeous homes decorated for the holidays!
The post Welcome to the Holiday Housewalk Linky Party 2018 edition! appeared first on Jennifer Rizzo. from https://jenniferrizzo.com/2018/12/welcome-to-the-holiday-housewalk-linky-party-2018.html |
About UsHi Im Veronica. Im a mum of two. Living in the UK. I absolutely love dressing my kids up in stylish little outfits and showing them off around town. When I'm not running around town with my kids, I'm shopping or designing my flat or someone else's. Part time interior designer and self appointed home decor expert. ArchivesCategories |


 Cue the Birch Tree Wallpaper Mural!


 RSS Feed
