|
Lilacs are one of my favorite late spring flowers.They are one of my favorite flowers to decorate with, and we only get them a few weeks out of the year! I love the color, the sweet smell, and the non-nonchalant way they just hang out in a vase, knowing they are awesome. There is nothing more frustrating though than anxiously waiting, and finally, when everyone else has these bushes loaded with big, lovely,fragrant blossoms, and yours either looks incredible sparse, or there are none at all.I’ve had that happen a few times, and it’s always a bummer. I did some research, and realized it’s not just because my plants hates me, and has a personal vendetta. I found quite a few real reasons for “Why didn’t my lilacs bloom?” and how to troubleshoot them!
(this post contains affiliate links) Pruning too late, or too much. While you can find Lilacs that rebloom
Late freeze. If the bush is getting ready to bloom, and then you get a surprise deep freeze, this can damage the flowers and buds.If you know it’s coming, you can try covering the bush with a heavy blanket if it’s just a quick freeze, otherwise, hopefully next year, there will be better luck with the weather. For us, this is a common practice in Fall as well. Especially with Rosemary. It’s age. Lilacs can live a really long time, but can start decreasing blooms the older it gets. This is where aggressive pruning can help rejuvenate it. Lilacs set blooms on newer wood. If you have thick, round, trunk like stems, they are probably too old to produce well. Cut 1/3 of the old wood out with pruning shears Not enough light. Lilacs need 6 hours a day minimum. When the shrub was planted 8 years ago, it might have been full sun, but if other trees around it have grown, it might not have enough now. Unless it’s small enough to transplant, and the offending tree can’t be trimmed to let more light in, it might be time to plant another Lilac in a second location. There are some great plants you can plant in the shade, just not Lilacs. Not old enough. Depending on the variety, it may tale a few years to set real blooms after they are planted. I had a lilac that took 7 years, true story. Everything else was perfect, it just wasn’t feeling it. Finally 7 years in, it has beautiful flowers. Talk about an exercise in patience. Well, not really. I planted 3 or 4 others in the mean time that gave me flowers before that one ever did. It must have sensed my displeasure, and that was getting ready to rip it out to put something else in, and it finally got to work and produced flowers.
Insects and viruses. Lilacs can get various insects like scale, or borers. Most of those can be easily treated. However, if your lilac picks up a virus such as a blight, and you have multiple plants, it’s better to remove the shrubs to prevent spread. Don’t plant another lilac in its place either. Over-feeding/fertilizing. Generally, what’s in the dirt is perfect for lilacs and they don’t need extra food. In fact, too much nitrogen can hurt blooming. It will produce leaves, but not flowers. If they aren’t blooming, and you’ve ruled out everything else,you can always do a soil test to see if there is some nutrient they are missing. I hope this helped answer questions as to “Why didn’t my lilacs bloom?”, and some other troubleshooting tips for big,beautiful blossoms the next year!
The post Troubleshooting why didn’t my Lilacs bloom? appeared first on Jennifer Rizzo. from http://jenniferrizzo.com/2017/04/why-didnt-my-lilacs-bloom.html
0 Comments
Well hello! I don't know about you, but I'm ready for the weekend! This has been a busy week and I'm ready to
The weather around here has been beautiful, the plants and flowers are growing like crazy and this time of year just makes me incredibly happy. I've been adding some spring touches around the house that I'll share with you soon, but for now I'm back with another group of beautiful printables you can use in your home. (I'll link to past round ups at the bottom of the post!) I share these a lot for the different seasons because they are FREE and SO EASY to add to your home. You need a printer (or a place to email it to be printed), paper and a frame. That's it. If you do it at home it's nearly free. I use card stock from the craft store that you can get for half off -- I can print off a few for less than a dollar! Here's a list of ten free spring printables I've found recently. Love them all! You will need to click on the link below each photo to get to the full resolution of each image. I had to start with a favorite. The rain boots! How perfect! This one is going up in our home: 
These are just art, plain and simple. Beautiful: 
Love the bright flowers and chalkboard look combo of this one: 
The pink and gray in this printable is what caught my eye. So pretty: 
This one is available with the hydrangea in a variety of colors! 
This is another favorite! She has SO many beautiful options that you can customize with whatever letter you want. What a great, inexpensive gift idea: 

Another watercolor option that is just lovely: 
The blue is a pretty option as well: 
This one is perfect for the season and works well past Easter. I love it: 
You'll probably see a couple of these in our home -- I like that some of them can be used throughout the spring and summer and fit in just fine. You can see last year's round up here and here's a tutorial on making your own printables. Have a wonderful weekend -- I'll see you next week! from http://www.thriftydecorchick.com/2017/04/free-art-ten-pretty-spring-printables.html
OK...you are all the sweetest for being so kind about the real life post earlier this week. Please stay friends with me after this one though. That was nothing. There is a "room" in our house that I organize every year or two, and then over time it becomes a total disaster again.
Over and over. This time...and I say this every time...but I mean it this time...is the last time. I swear. The last time we will ever let it get this bad.
Since I purged our home a couple years ago the inside stays relatively picked up and organized. When you have less stuff it's so much easier to do that (sometimes I stray from that for reasons I explained in the post earlier this week).
And most of the time our garage isn't too bad. We let stuff pile up on the work bench, but nothing too awful. I don't even know what it was this time -- I started putting stuff out there to sell/donate and just never got to it. And then the pile grew and grew...you know how it is right? What's one more thing when it's already a mess? Yep. Did that. A lot.
So I'll show you the worst part in a minute, but let's start with the area that took the least time to organize. I shared how to make this SUPER inexpensive work bench years ago and I still love it. We are totally guilty of unloading stuff onto it though. It catches everything from our cars.
Here's how it looked up till three days ago:

When I'm working on a project it doesn't get this bad, but it's been awhile since I've had to use my saw for any length of time. So stuff piled up. You know what's funny? I set my timer for 20 minutes (it's what I do when I'm overwhelmed with messes) and I had the whole thing cleared off in that amount of time. That includes putting things back where they belong any everything.
I find so often that we make it waaaay worse in our heads, right? It wasn't that bad! Now I did spend more time vacuuming the bench and getting the floor cleaned up, but getting it cleared off wasn't that bad at all.
This next area I just finished up this morning. (I'm saving the worst for last.) ?
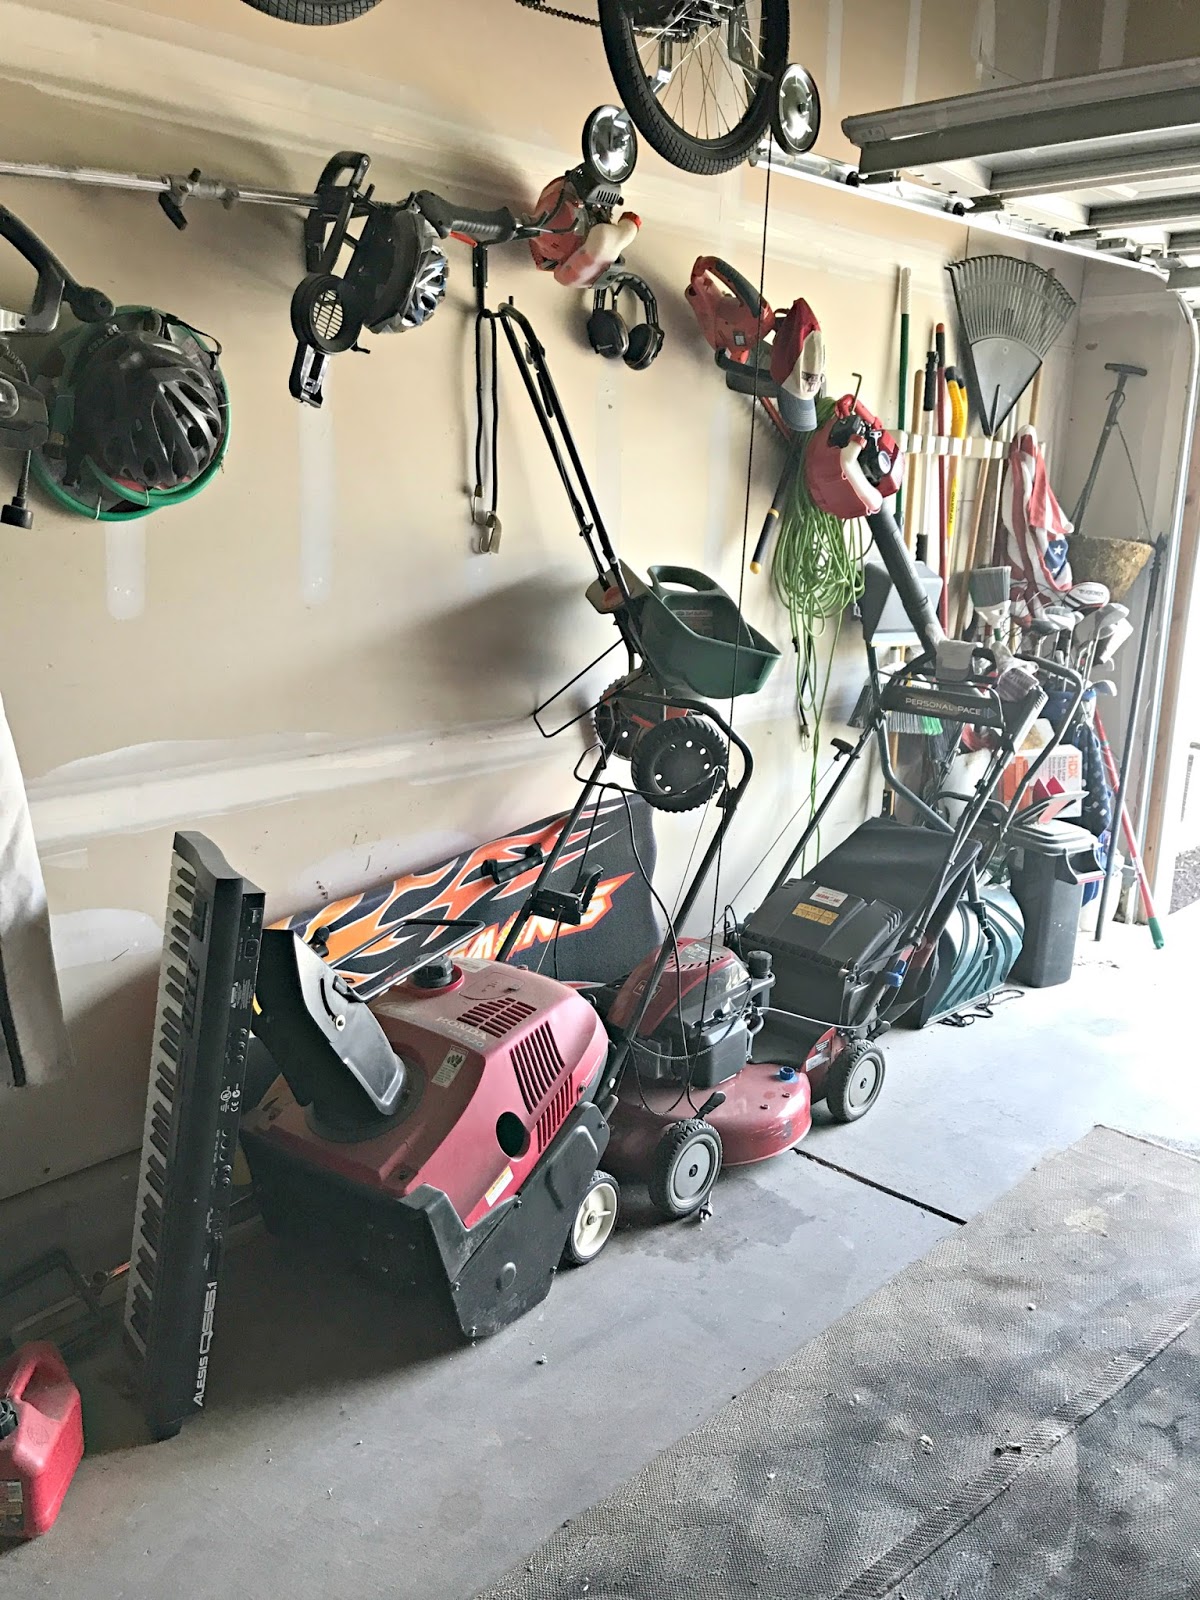
This is where we keep all of the lawn stuff and it wasn't quite as bad as it's been in the past:

I know that rug is gross, but it actually serves a purpose. It's an old outdoor rug and I laid it down in here to spray paint on. Now I don't have to worry about the floors getting paint on them. And we just pull in right over it. It's ugly but it's staying for right now. Someday I'd LOVE to do a nice new epoxy floor in here.
So before I show you the after photos, here's what the other side of the garage looked like till just two days ago:

Let's take a closer look, shall we? Or not? Do you still like me? ?
So many issues here. Mostly laziness...that's the big one. But what's funny is we still both parked in the garage all this time. It cracks me up because we would pile this crap to the ceiling but we are adamant that we be able to park in the garage. Priorities people:

See those balls piled up in the back there? We've used this for years and I thought it would be such a great idea:

We also put outdoor toys in it. I thought I was pretty smart using this thing but it doesn't work great, at least it didn't for us. Stuff piled up in there and when you wanted something from the bottom you had to dig everything else out. Everything got buried. I do think it would be great for laundry sorting though! I'll show you our solution in a bit.
So here we go with the afters! Decluttering everything took no time at all -- because of the Konmari book I am now able to make pretty quick decisions on what to keep and not. Things I waffle on go and I feel immediate satisfaction when they're out of my hair. When in doubt, LET IT GO. Turn away and slam the door. ;)
Here's a reminder of the work bench before:

And here it is now:

So one thing we had done in the garage years back was to have built in storage installed up high and from floor to ceiling. We have two long upper shelves like this one above the work bench and the garage door:

We had this all put in when we finished our basement and needed to get holiday storage out of there. I knew we could take better advantage of the height of our garage (it's probably 12 feet tall). These have been MAJOR life savers and they weren't that expensive at all -- they're made with plywood and 2x4s.
Here's the side of the garage again as a reminder:
And here it is now. This was mostly just putting things back where they belong. I got rid of a couple brooms but that's about it:

I wish we had painted the garage before we moved in 13 years ago. I think it makes SUCH a big difference in a garage but there's no way we're dealing with that now. The thought of taking all this stuff down gives me the shakes.
And the piece de resistance...the bump out area before:
And now, after a couple trips to Goodwill and some cleaning:

I told you most of that stuff was going anyway, so why we let it just pile up I have no idea.
We gave away most of what was over there. One biggie was the fridge -- we just didn't use it like we thought we would. I plan to add a smaller fridge in here for water and drinks for the kids when the play outside. We have one in the basement we're going to bring up, so no money spent.
Did I mention I didn't spend a dime to organize all of this? I love it. We already had the new ball rack, but it had been sitting in the box for at least a year. The white Container Store caddy used to hold Legos in the basement (back when I thought I could keep them organized by color, hahahahahaha). I was going to get rid of it but realized it would be great for the smaller balls, water guns and tools. It holds a TON of stuff. I may move it over by the work bench to see if it fits there.
Here is another area of floor to ceiling storage we had built:

I put the small shelves up years ago for odd and ends and I built the hanging wood storage back then too. It's great for long piece that used to take over the floor space.
I still struggle with getting rid of extra trim and wood...I'm SO much better than I used to be. But so often I'll just need one piece and am thankful I keep the longer scraps. (I only keep leftovers longer than four feet now.)
So remember the storage above the work bench? Well for at least four years now we've been getting up on ladders and risking our lives twice a year to get our 12 foot Christmas tree down from there and putting it back up. It scared me so much that I thought of a new solution this year. And it was one of those DUH moments when I realized we should have done this from the start. We put the lightweight bins up there that are MUCH easier to get down, and used the space where they used to sit on another built in to put the tree:

We don't have most of it in bags because it is GINORMOUS and there aren't even bags that it fits in. Being down lower now we may have to shake it out a little bit to get any dust off each year, but this works eons better than what we were doing before. We don't have to risk our lives to get it down anymore and that's a good thing. :)
Here's a side view of that storage -- I left a little bit open at the end so I could keep a trash can there. I've realized having that near my car helps me keep the car much cleaner:

Some of you who have read this blog for years may remember my black garage door project:

That door gets beat up and it's held up pretty darn well. It's needs a new coat of paint someday, but that's low on the list.
So there you go, our worst area, organized. Have I mentioned I'm not letting this happen again? Probably once or 20 times. But this time I mean it. Hold me to it! Feel free to rake me over the coals in two years if I share another post like this. :)
Do you keep a clean and organized garage or do you let it go like we have? Do you always park in the garage no matter what too?
Here are a few items that have helped in our garage organization over the years, in case you are interested (affiliate links for your convenience):
from http://www.thriftydecorchick.com/2017/04/our-pit-of-despair-before-and-after.html I am headed to the SNAP! conference, while hubby stays home and holds down the fort! It’s my first time going, so I’ll give you the full scoop when I get back. I still haven’t packed! I wanted to share some crafty teacher gift ideas as we gear up towards the end of the year! These are fast, and easy, and not very expensive. They add a nice extra touch to go along with that coffee (or other drink) gift card.
I love these hand-stamped tile coasters. They were so easy to make, and make such a cute gift! Plus, after working hard all year, don’t they deserve a nice place to set their much needed glass of Chardonnay,after a long day of telling Johnny to get his finger out of his nose, and trying to teach common core math? I know I need one after trying to help my kids do common core math. By the time the oldest got to 5th grade, I was already too stupid to do it, and we needed tutors. For 5th grade math. There’s a reason I’m an artist.
On a side note, These drippy, gold-leaf wine bottles are the perfect thing to use up all of those empty wine bottles previously mentioned from helping with homework….
A little wheat grass, or small plant in a cute hand-dotted pot can help give them a nature and zen.
This tote bag is really easy to make with acrylic paint and a sponge stamp! It’s a great for a teacher gift idea ,or for carrying those library books home! Or,back when I was a third grader… a bottle of wine. Let me tell you a little story about teacher’s gifts. At the end of every year, my mom would send us to school with a bottle of booze in our bag. I mean, my mom knew us, and knew after dealing with her rotten children all year, the teacher needed a good, stiff drink. Plus, it was the 1970’s, and I think everyone was drunk all day long anyway. In third grade, I walked to school and bumped my bag on the ground, shattering the cheap bottle of Mogen David (which is really one step up (or down) from Boone’s Farm Strawberry Hill.). Everything, my books,lunch bag, me, ended up covered in purple booze. I cried, and cried, and all day I reeked like a tiny drunk. It was magic. And completely traumatizing. True story.
You can also make a pretty handmade card to go with your gift. It’s easy with a few watercolors.
I know gift cards are always a good gift option, but I love a handmade touch too, and a little something extra with these easy teacher gift ideas. Just take my advice, and keep the booze at home.
Save Save The post Easy to make crafty teacher gift ideas appeared first on Jennifer Rizzo. from http://jenniferrizzo.com/2017/04/5-crafty-teacher-gift-ideas.html
Hey there! Hope you had a lovely Easter weekend! We had so much fun. With our activities this weekend I didn't get a whole lot of DIY done and it was wonderful. :)
I had to laugh as I walked through our house yesterday afternoon...it seems that literally no matter what room I'm working on, the rest of the house goes to crap. I mean it -- I am simply unable to keep up with room makeover and keep the house somewhat picked up. Lately this is because of the upstairs bathroom redo.
I've known this for years now. I thought it would be different when the room I'm working on is one of the smallest in our house and I can even close the door and totally ignore it all, but no. It hasn't made a difference at all. It's a phenomenon I can't explain. :)
Because I know it can get discouraging at times to see all the totally put together spaces on blogs and social media, I decided to show you our house as it is right now. I only cleaned up trash, because gross. Otherwise this is how these spaces look right this second. I spared you the worst messes (the basement is a total disaster right now) but this gives you a taste of our house at the moment.
I have to laugh when I see perfectly lovely nightstands because that's just not the norm in our master bedroom. I at least clear them off when I take photos:

But this is the norm. Stacks of books and magazines and random stuff. Usually there's a few water bottles on there but I did clear those off:

We bought that back massager (on the floor) at our local home show and it is AMAZING. It is perfect for my lower back. I'll have to find it online and share with you sometime.
And of course...the bed isn't made. ;) But my excuse today is that I'm washing the sheets. (I have no excuse for all the other days.)
I've made it a goal for our home that every room is used. Our living room isn't a "fancy" room -- it actually has the comfiest couch in the house:

Easter hit this weekend and it has stayed. And those eucalyptus leaves are at least three weeks old and quite crunchy:

Our stairs pretty much always have stuff on them so they rarely look like this:

I bought this storage basket for the stairs last year and it really does help. Until you ignore it for the last 50 or so trips up the stairs:

You can see the pile on the basement stairs too. This is a constant, but usually it's at least contained to the basket. ? And you can fit a TON of stuff in there too, so this part is going to take longer to clean up.
Our office/craft room actually stays pretty organized most days:
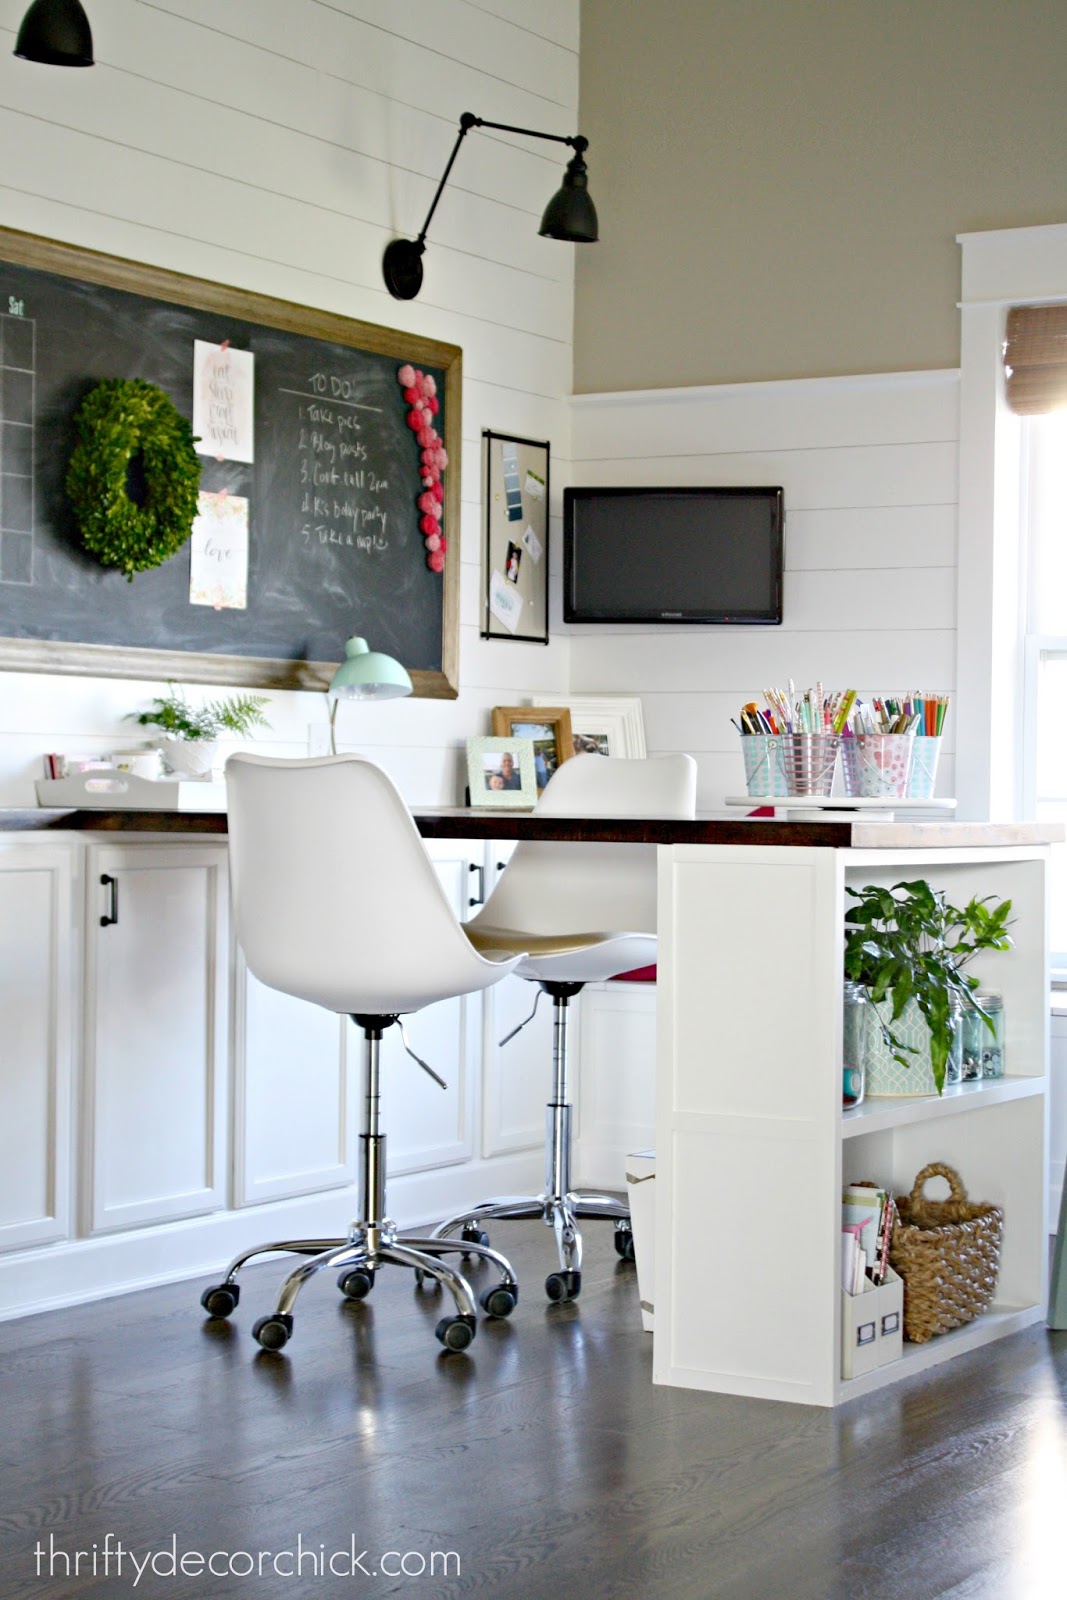
That is till a renovation happens in a nearby room and taxes hit at the same time:

See those little pink paper flowers on the corner of the chalkboard? And how most of them are gone now? One of our cats picks a couple off a week, bats them around, I put them back up, she does it again and then they disappear. I'm sure I'll find 20 of them under a bed one day.
The window seat in this room has become the drop zone for everything that was in our son's bathroom. This is how it usually looks:

But this is it now. For only having one cabinet in that bathroom, we sure did have a lot of stuff in there:

The giant Pikachu? He's just a bonus. My son moves him from room to room. :)
And finally, we have the only space in our house I'd consider a hallway -- and it's tiny. Because you can't see what's on the floor when you come up the stairs it's become another dropping point for the bathroom stuff. Here is the book nook hallway on a good day:

And here is is right now. You can see another pile of bathroom stuff in the guest room too:

Seriously, where did all of it go in that room before? It's funny to see how much we actually had in such a small space.
I know some of you will look at these and say these messes are nothing. But I didn't show you the basement. ;) And no, I don't think they're anything awful, but they are real life.
I don't freak out about messes. The house has been like this for a few weeks now because we've been off living life and having fun. I do get to a point when I get annoyed with it though...and that point is now.
I need to find a spot for the bathroom stuff (that little hallway will be where I put everything till the room is done), but otherwise the rest are fast clean ups. Although the stairs are intimidating me. I can tackle most of these messes quickly today. But we've let our garage get piled up lately so I've been working on that first.
I love our home and think even with the messes it's pretty. A lot of them make them feel more like home to me -- I always want people to feel at home, relaxed and never be afraid to have fun in our home. Lately we've been doing a lot of that. :) I think it's important as a decor blogger to take a minute sometimes to share how things look away from the perfect shots.
from http://www.thriftydecorchick.com/2017/04/our-house-right-now.html
Watch any home improvement show on television - most designers will include the kitchen in their remodeling plans. Often painting, flooring, and walls are the focus of the renovation. However, many homeowners don't have the time or want to deal with the mess of a total remodel.
Does this apply to you? Can you have the kitchen of your dreams without totally destroying your home? Of course! Here's how you can use appliances and ordinary kitchen accessories to make your culinary dreams come true!
So, what should you look for in new appliances, and what equipment is most important in a kitchen? For most, the cooktop and oven, refrigerator, and dishwasher offer conveniences people can't live without. These machines have also received major upgrades in recent years.
Let's look at how each contributes to your dream kitchen.
When preparing to buy cooking appliances, each homeowner should decide what hardware fits him or her best. Cooktops come individually or as a part of an all-in-one range and oven. Cooktops can be glass, ceramic, or metal. Some might prefer a wall oven to the all-in-one unit. Many times an individual will make purchasing decisions based on personal taste, price, and available space.
You will want to consider convection ovens versus a traditional oven (these appliances are powered by either gas or electricity). Convection ovens are more efficient in that they use twenty-five percent less energy to cook while cooking more quickly than a conventional oven. The convection oven costs slightly more, but you will soon recoup that money in savings on your power bill.
You will need no special kitchen accessories when using a convection oven, but once you've dirtied your pots, pans, and bakeware, you will want a dishwasher so that you won't have to wash everything by hand.
Few people enjoy hand-washing dishes (much less have the time), so a dishwasher is considered a necessary appliance. Dishwashers today are less noisy, use less water, and clean more thoroughly than older models. No pre-rinsing required! Many washers use up to fifteen percent less water than models only two or three years older. Others feature thirty minute washes to save both time and money; still others feature options that allow you to set a timer for washing at a more convenient time.
Perfect if your dream kitchen involves clean dishes with minimal effort! While the oven/range and a dishwasher are two of the most important kitchen appliances, one must include the refrigerator on the list of must-have items.
Not only is the refrigerator most likely the largest appliance in any kitchen, it is also probably the most important appliance you own. Food storage is imperative even for those who don't enjoy cooking. Today's refrigerators come in a variety of sizes and designs and offer a plethora of features. Like your ice cream a little on the soft side? Now certain models offer settings that allow homeowners to set more precise temperatures (no more setting ice cream out to thaw!).
Some refrigerators offer adjustable door compartments and shelving units. No longer will you be forced to sacrifice freezer space for the convenience of an ice maker as many new units feature smaller devices. LED lighting is present in most newer models as well. Whether you prefer an upright fridge/freezer unit or want a smudge-proof stainless steel model with a French door, there is a refrigerator to fit your style!
Finally, no dream kitchen is complete without the perfect set of accessories. Your perfect kitchen gadgets really depend upon you and your personal preferences! Those who enjoy cooking will covet cookware sets.
Health conscious individuals may seek out juicers and blenders for tasty smoothies. Coffee fanatics will demand the perfect pot whether it be a percolator or a coffee pod machine. A dining table and chairs will most likely complete the kitchen of your dreams; be sure not to ignore small items such as place mats to accentuate the colors of your dream kitchen.
Also, you can add inexpensive items such as clocks, decorative soap dispensers, even bulletin boards to brighten up your space!
Creating the kitchen of your dreams doesn't have to involve gutting your space! You can achieve your fantasy cooks'room with the right appliances and kitchen accessories. 
from https://digs-homegoods.com/blogs/news/creating-your-dream-kitchen-around-appliances-and-accessories from http://digshomegoods.blogspot.com/2017/04/creating-your-dream-kitchen-around.html Welcome if you care coming over from Finding Silver Pennies! I am very honored this year to be a Haven Mentor and the Haven conference this year. As mentors, we were all a asked to answer some questions about blogging and our experiences with conferences., so here it goes! This will be my 4th time going! I’ve spoken twice and made many wonderful friendships!! It’s pretty amazing to meet people who think like you from all over!!
1. How many years have you been blogging? It will be 10 shiny years this August! This really started as a hobby for me, as a way to connect with the outisde world. Blogging was just a few years old, and I was a stay at home mom,with 3 kids under the age of 5. I think it was a little crazy-feeling at time time, and really needed to connect. I never thought it would actually turn into something more. I had big, secret dreams of being published, maybe even publishing a book, but it was always a “someday” kind of a thing. I never actually thought “someday” might really come true! I now work with many brands such as Michaels, Decoart, and Cricut. I have designs on Wayfair, and am working on licensing my own line of product! I was blessed to have a first book come out,
2. What is your favorite DIY project that you have completed? This is actually really hard, because over 10 years there have been so many! If I had to choose one, I would have to say our kitchen, which was featured in Country Living magazine.
3. What is something useful you have learned from a blog conference? The biggest thing I’ve taken away from blog conferences is to go to them. I always walk away with something new. It’s so easy to sit behind the screen by yourself, but unless you get out there, you aren’t expanding your horizons and finding away to earn new information. I’ve gotten just as much information and motivation from the down times as I have in classes and seminars. It’s important when you live in a world, to experience every aspect, and I think meeting and interacting with like-minded people is one of them.
4. What is something you love about blogging and what is something you wish you could change? Before blogging, it was really hard to get published. I wrote many,many query letters I never got a reply from. I love that blogging has made publishing so easy. Without it, I might still be writing a lot of dead-end letters.There are so many opportunities if you are willing to take risks, rejections, and rewards all wrapped up at once! One thing I don’t like though are the appearances and comparisons. It is so easy to compare yourself to somewhere who seems like they’ve cracked the code. It seems sometimes like everyone is doing so much better than you, while in all honesty, they are struggling right a long beside you. But, since there’s no way to know what is going on in someone else’s life, it can make you feel less than, and I never really liked that part very much. That’s why it’s so important to keep your head-down and work hard.
5. What is one piece of advice you would offer a blogger–new or otherwise–who is going to Haven?
Just go! And, be willing to talk and approach people. I’ve met so many cool people like Mike Holmes,Sherry Young, and Christiane Lemieux, just by going up and saying hi! We are all in the same boat. No one is too good to talk to you or better than you, even if they are a “bigger” blogger. If they are there, they are approachable! Start conversations! You have something amazing to offer because you are you!!! Talk to brands, make the most of your time, and enjoy the experience!! It’s all about stepping out and talking those risks so that you can expand your horizons, and work towards those big dreams we never thought were even possible. Because they are right there, waiting for you to take a step towards them!
I am so honored to be asked to be a Haven Mentor this year, and meet even more new friends, and catch up with some old ones! Head over to Chaotically Creative next and read her inspiring answers as a Haven Mentor!!
Save The post Haven mentor blog hop 2017 and big dreams appeared first on Jennifer Rizzo. from http://jenniferrizzo.com/2017/04/haven-mentor-blog-hop-2017.html I go through phases with reading. It seems like for the longest time I’d had no interest in reading, suddenly, I am going through books like bags of candy. I thought I would share a few of the books I just finished, and am currently reading. If you have a book and would love to share, please put it in the comments! I always love discovering new books! (Post contains affiliate links) You can click on any of the pictures to check out the books. To see past books I’ve read click here,or here
So are there any books you’ve been reading you can share? At night, I’ve decided to put the phone down, and pick up books before bed. I just made a library run the other day and stocked up. It’s a much better habit!
The post Currently reading… appeared first on Jennifer Rizzo. from http://jenniferrizzo.com/2017/04/currently-reading.html
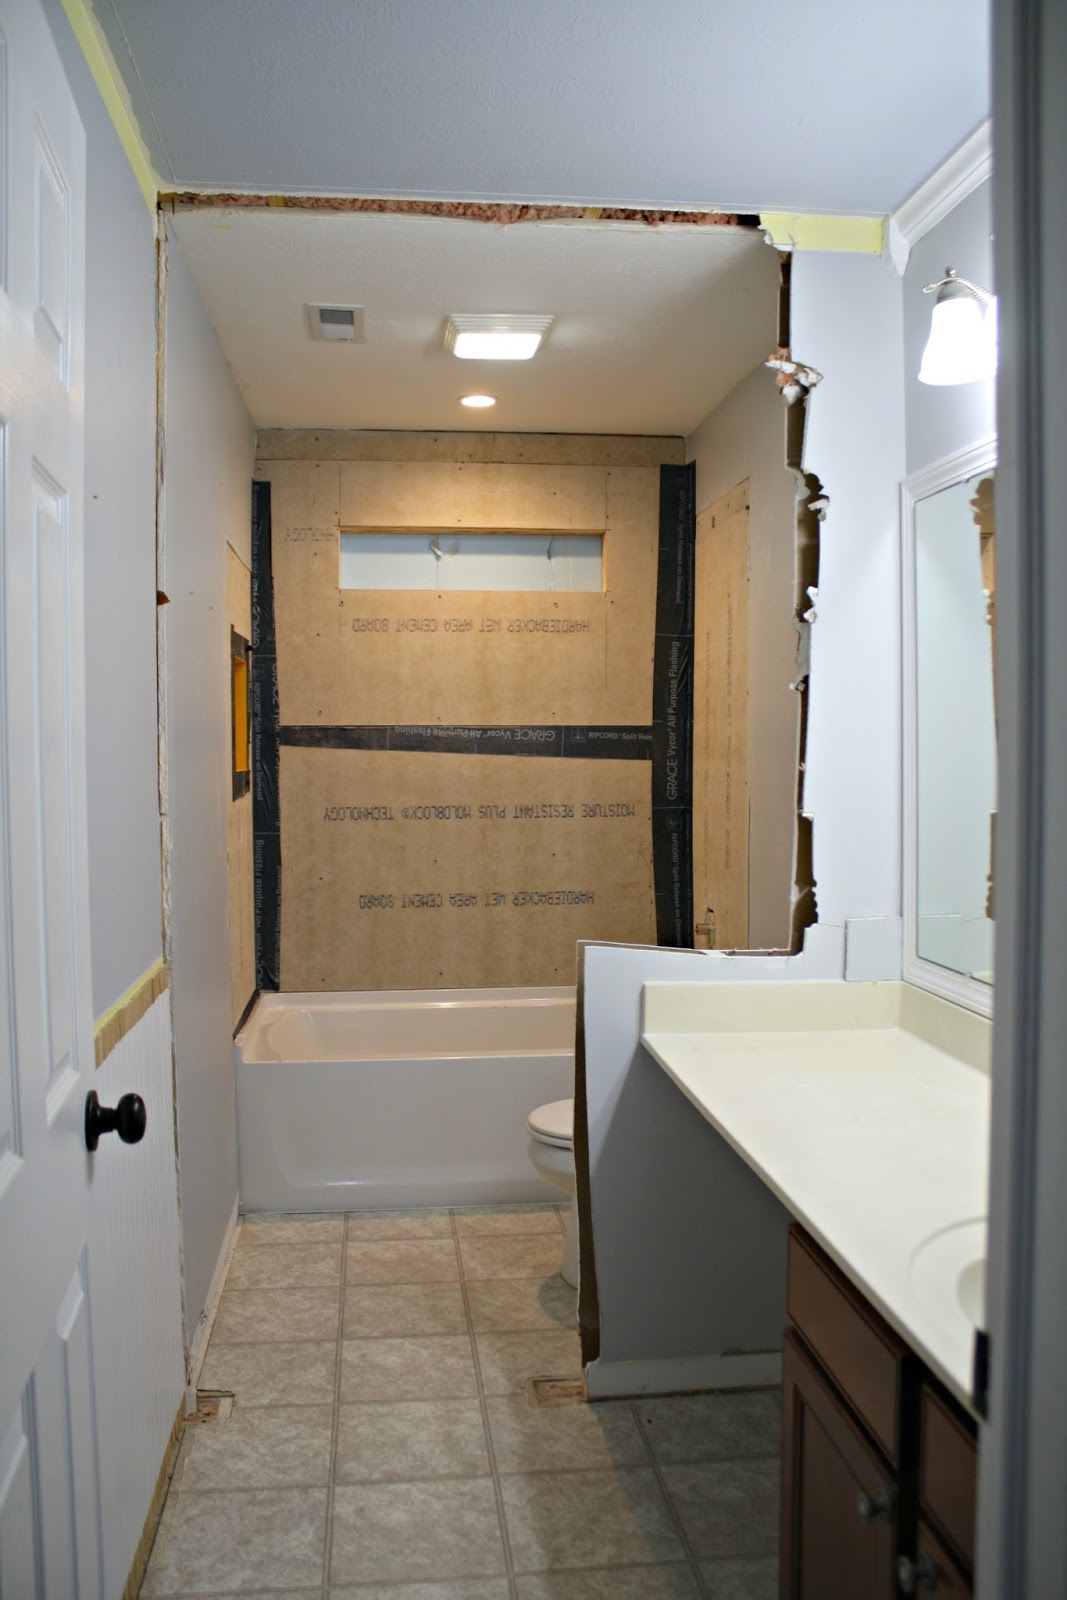
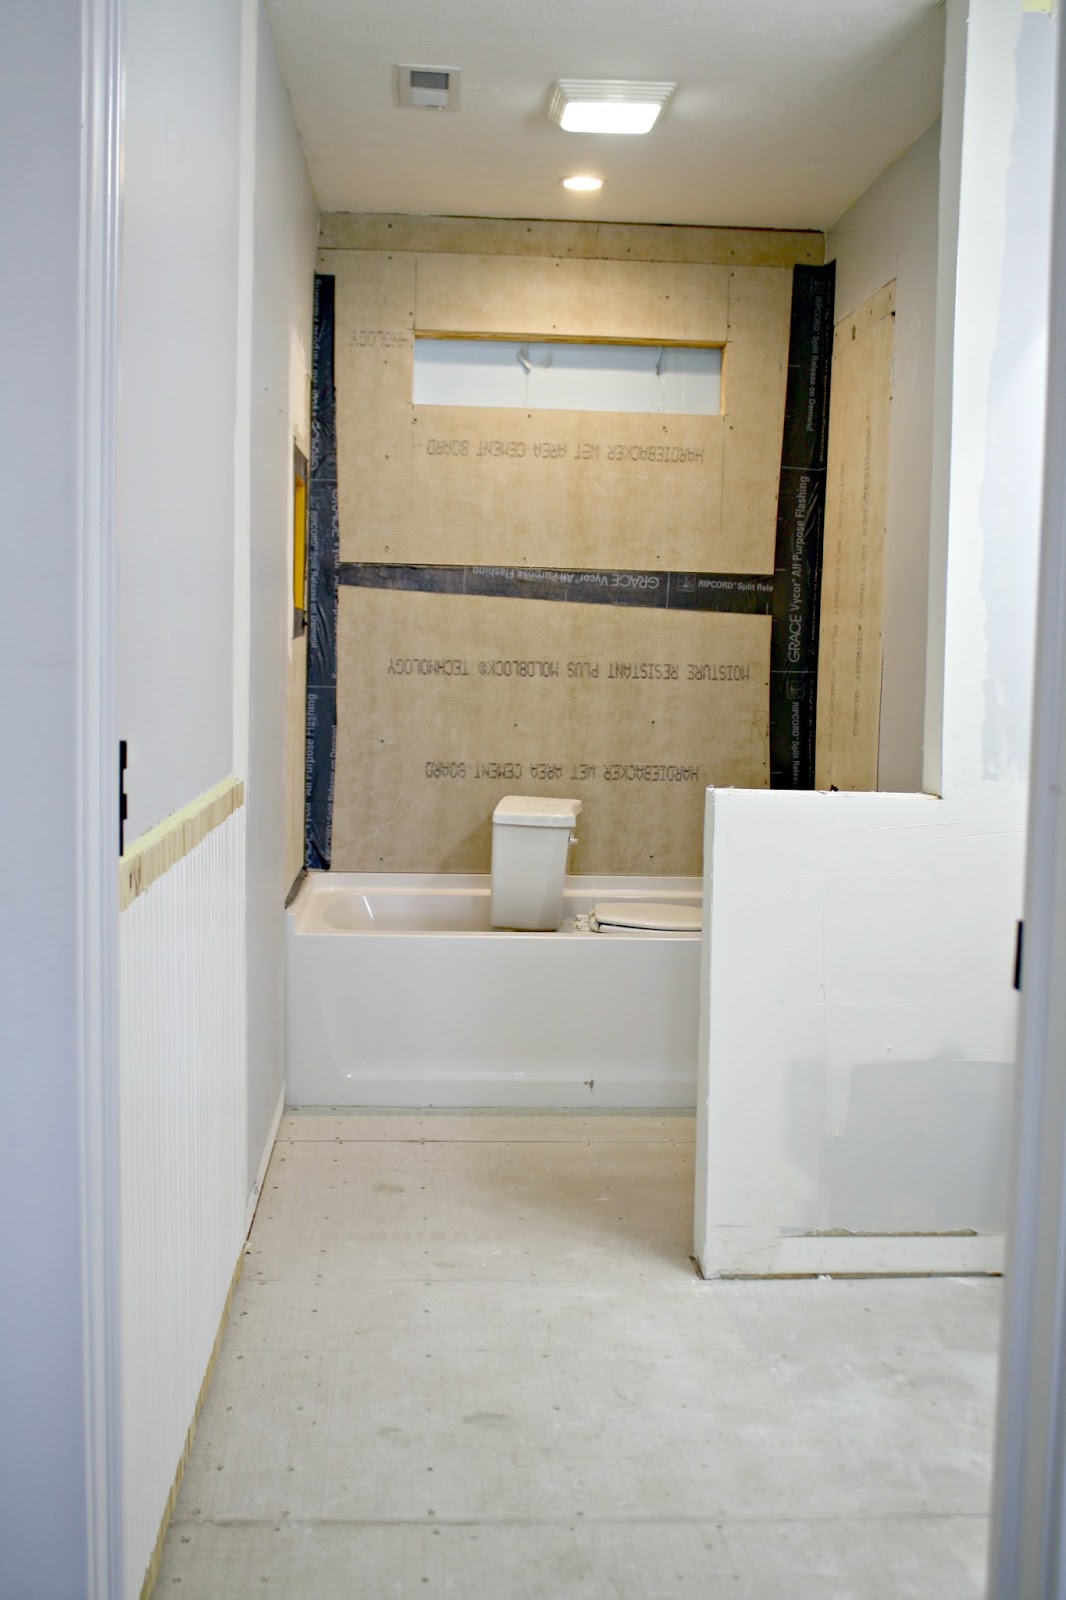
Hey all! There's been some great progress in the bathroom makeover this week and now I can't wait to get my hands on some projects in here.
I'll share the tile options I'm looking into first and then where we're at with the room at the end of the post. If you remember, I shared the latest update (the new tub, plumbing fixes and lighting updates) a couple weeks ago:

I can't even believe how much better it looks already! But first, the next step is tiling the floor. I'm so excited to get this done and want to do it soon (I may start this weekend) because having the floor done means we can get the toilet back in and get it somewhat functional again.
Then we can build the vanity and get the majority of this room done! So I need to make a decision on the tile ASAP.
I've visited three stores now to get ideas and I'm sharing some of my favorites with you (and one that I didn't even think would be an option but looks awesome!). I'll share where I found each one, the name and price under each photo in case you want to check out any for yourself.
I'm looking into gray tile but want a dark gray (and it's proving harder to find than I thought). There are a ton of gray options but most are lighter. I really liked this concrete looking porcelain but it's a little too industrial feeling for me:

Cityside Gray Tile, Lowe's
1.99 square foot
This looks so much like concrete right?
I loved the color of this one! It is a good contender and the price is great, but it has little sparkles all over it. If it didn't have those I'd probably be using it:

Galvano Charcoal, Lowe's
$1.99 square foot
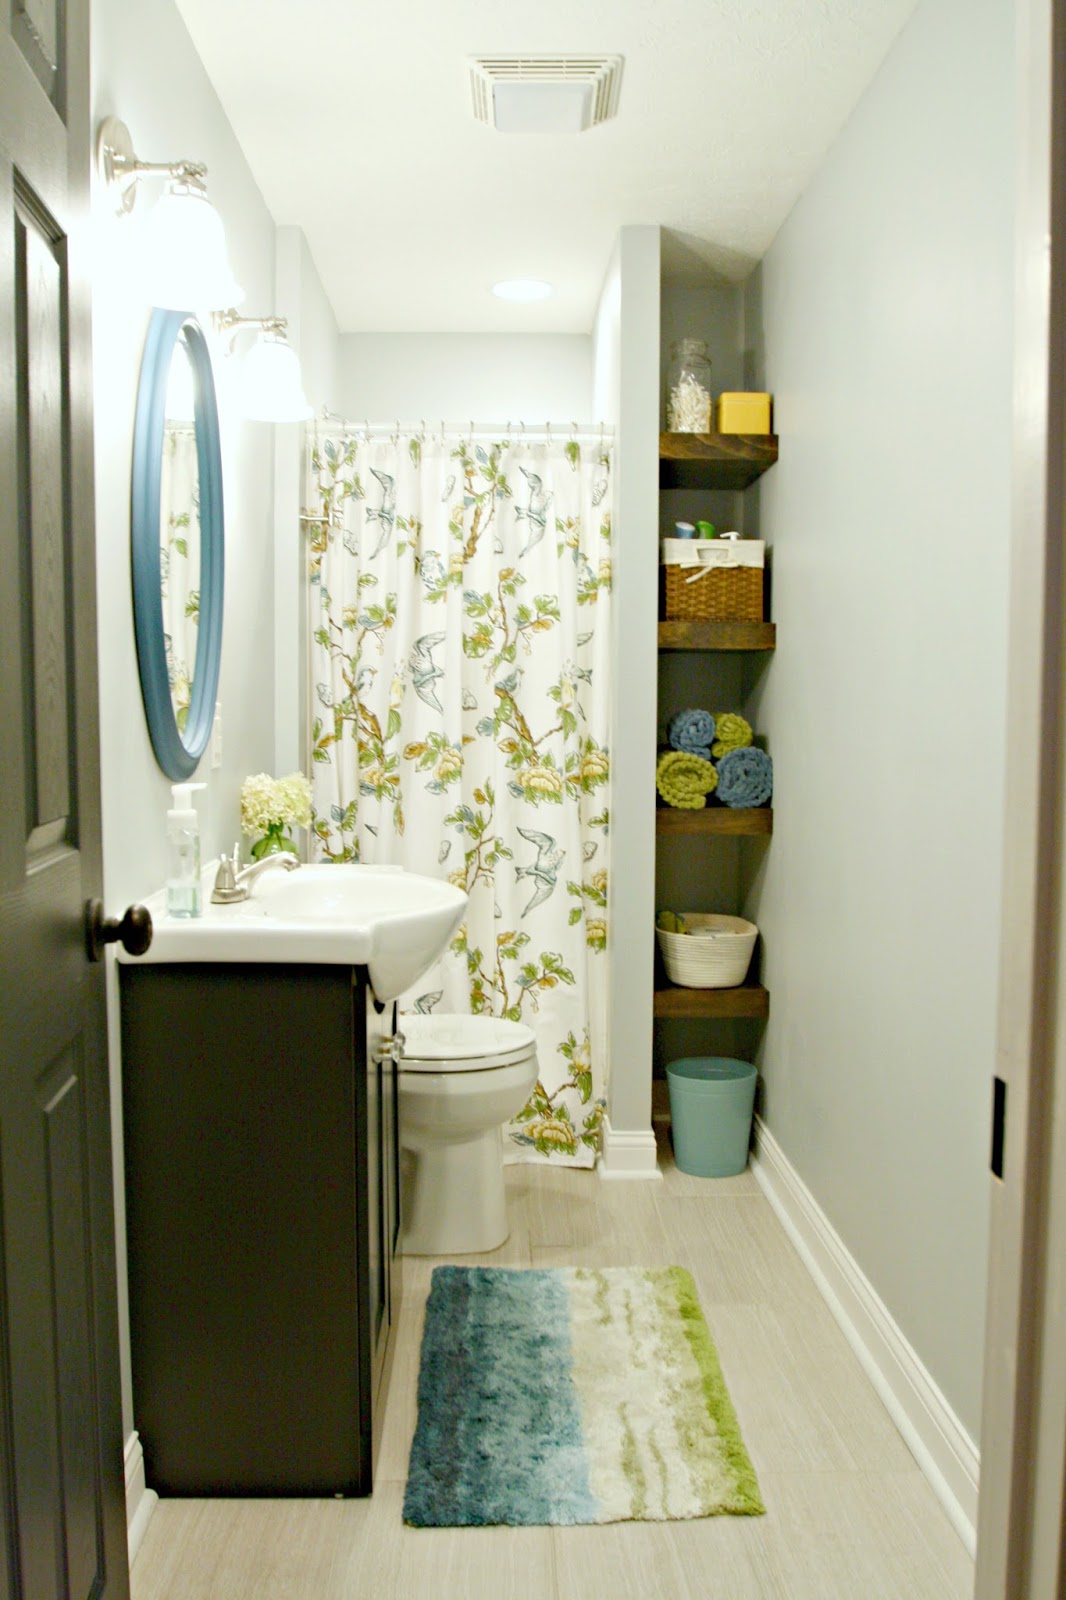
This is the tile we used in our basement bathroom and I LOVE it:

Leonia Silver, Lowe's
$1.79
The price is RIGHT. I'm bummed though because they had a darker version back when we installed it in the basement. Now they only have this and a sand color. Whaa waaaa. It is a beautiful tile though, at a great price!
Here it is in the basement:
I LOVE this next one, even though it's a bit lighter than I wanted. It so similar to my favorite one, but lighter. I love the linen look:

Silver Strand, Home Depot
$3.16 per tile (actually a good price since it's priced per tile)
I really like this one -- it's on my short list. It looks like slate but doesn't have the variation in height like slate does. It's on the higher end of what I've been looking at (but still a good deal):

Montauk Black, Home Depot
$2.99 square foot
I'm guessing when sealed it will be even darker, and that's my hesitation. It would probably go black instead of dark gray.
I wish I loved this one more because it is a steal! It's on sale for super cheap right now:
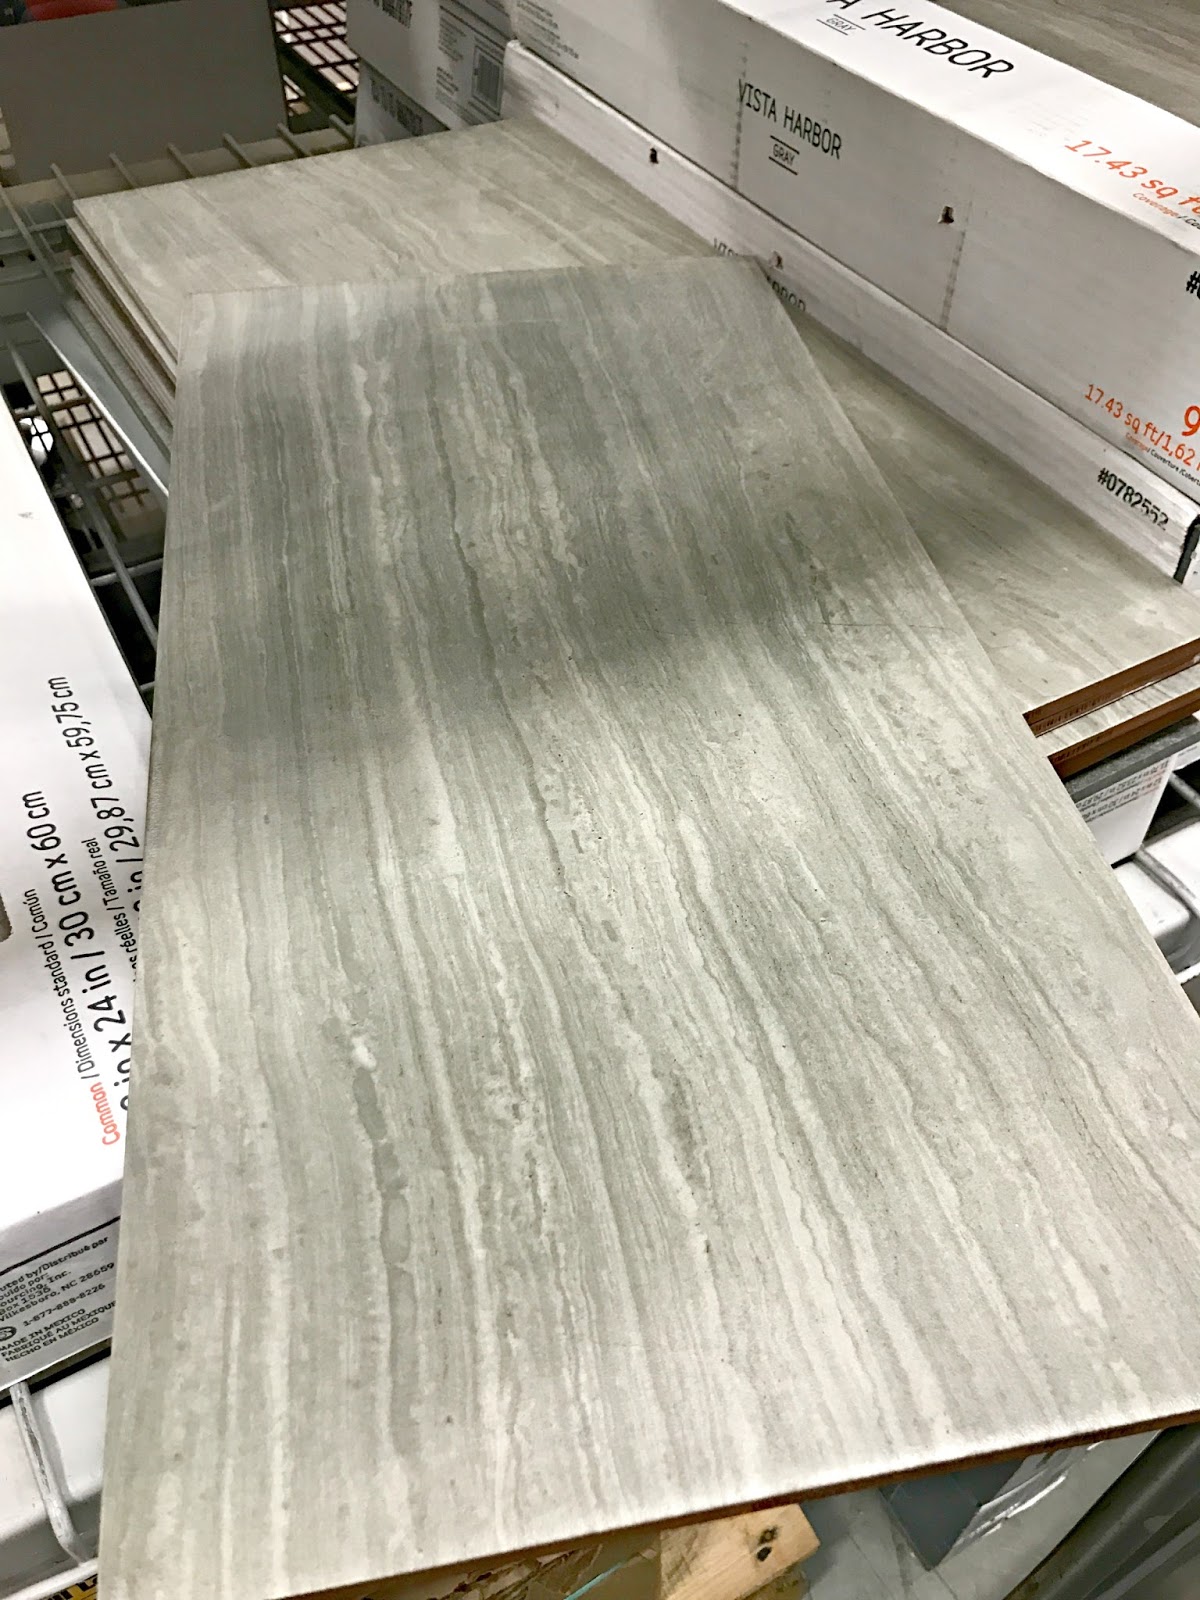
Vista Harbor Gray, Lowe's
$1.20 square foot
I bought one to bring home just to see if it worked because it's such a good deal:

It's a beautiful tile but just not what I want in here. I am going simpler and want a more solid color.
I found this one too, and really, really like it, but the price is way more than the others:

Cinza Escuro, The Tile Shop
$5.49 square foot
Thing is, this isn't a big space. I could splurge a little and it still wouldn't be much.
I found the one I LOVE a few weeks ago and after all the looking it's still a favorite. I'm thinking I would go with the darkest gray:

Linho tile, The Tile Shop
$2.99 square foot
Gosh I love those.
So I found an option at Home Depot I wasn't really looking into, but it looks GOOD. It's a vinyl product made to look like tile:

Allure Linen Charcoal vinyl, Home Depot
$2.29 square foot
Man, the price is great and I love the look of it. My only hesitation is if it can be installed directly up again the next piece. They sell grout you can use with them but I tried something similar in our mud room years ago and the grout did not hold up well.
Have any of you tried this product? I'd love to hear your thoughts. It looks as though it's a click and lock install so I can't imagine there would be any need for grout.
So there you go! My favorites are toward the end of the list as you can tell. :) I'm going to make a decision soon -- I'm definitely leaning darker. I think it will look great with the stained vanity and the white trim in the room.
Here's an update of the progress so far! If you remember, this is where we started:

You can read more on the mini makeover I did in here last year.
Then I went ahead and took down the wall by myself:

Here it is after the tub surround was taken out and the new window was framed in:

Next up I need to get that window ordered (I cannot wait for the day that goes in!!) and this weekend I hope to start the tiling. It shouldn't take too long. (Famous last words...)
After that I can work on the new vanity and get the plumbing hooked back up. We need to have the vanity light changed to two separate lights and then I'll move forward with my plan for the wall behind the mirror. More on that soon!
Let me know if you've tried that vinyl tile -- I'm intrigued!
from http://www.thriftydecorchick.com/2017/04/bathroom-updates-and-help-me-pick-out.html
Dig/s Home Goods and Housewares firmly believes your child’s room is their imagination. We also believe in our motto, “Nourish your kids imagination and you will enrich their lives beyond all measure.” Read on for some ideas on how our home goods can help enrich your child’s imaginative life.
1. Award-Winning Care for Our World Play Set by Karen Robbins & Illustrated by Alexandra Ball Robbins and Ball’s playset for middle grade children includes two essential elements for imaginative play: a book and a hands-on activity. The nonfiction book encourages kids to think about the environment and the world’s diverse animal species. To help drive the point home, young hands can punch out dozens of stand-up plants and animals. The set encourages children to engage in imaginative play with a habitat they create for themselves and animals and plants they can manipulate. This playset has won (or been runner-up for) three awards: 2012 Playset of the Year (Creative Child Awards), 2012 Top Toy of the Year (Creative Child Awards), and 2012 Runner-up in the Children's Books Category (Green Book Festival). 2. Award-Winning Tickle Monster Laughter Kit by Josie Bissett & Illustrated by Kevan J. Atteberry This interactive reading experience allows kids and caretakers to play together. The kit includes soft tickling gloves for acting out the Tickle Monster while reading the bedtime - or any time - story. Finger holes in the monster mitts make it easy to turn the pages and tickle at the same time. Books help encourage children to be curious about their world, and reading out loud helps reinforce learning skills and the importance of reading. A comforting bedtime ritual encourages regular sleeping patterns and sound sleep. The memories that your child will make with you will last them a lifetime. If your kids enjoy the Tickle Monster Laughter Kit, they may also like the Multiple Award Winner Boogie Monster Dance Kit by Josie Bissett/Compendium. 3. Kikkerland Critter Windups Awika and Pintacuda This collectible wind-up toy can spark all kinds of imaginative play. It doesn’t quite look like anything familiar. It’s not quite a robot, it doesn’t quite resemble an insect, and it moves like something out of a scientist’s laboratory. Children can explore motion and mechanics, getting an early start on thinking about STEM concepts, while having fun with this 3-dimensional, moving piece of art. If your kids like this wind-up toy, they might also like Kikkerland Window-Mount Solar-Powered Heart Rainbow Maker. It makes rainbows using refraction, a beautiful and fun way to get kids started thinking about the properties of light. You might inspire a future physicist. 4. Kinetic Sand Doggy Daycare Playset This playset is quite hands-on and interactive for loosely-structured imaginative play. Kids can experience the texture of purple and green (nontoxic) kinetic sand, then use their hand-eye coordination and crafting skills to make canine friends using the included molds. Then they can play with their new puppies in the Doggy Daycare playset. This fun and colorful activity for kids ages three and up is also easy to clean up. 5. I LIKE... A Great Big Book of Awesome Activities, Delightful Drawings, and Fantastical Fun for Kids of All Ages. (That’s You!) Written by M.H. Clark and Illustrated by Sarah Walsh This big, hands-on activity book will appeal to kids from the middle grades on up. It encourages not passive entertainment of the kind kids get from screen time, but active imagination and interaction with the pages. Kids must use their imaginations and creativity to complete this crafty book. It’s a great addition to any bedroom bookshelf or homework nook that can also travel with kids in the car, on appointments, etc. Conclusion
from https://digs-homegoods.com/blogs/news/how-to-develop-your-childs-imagination from http://digshomegoods.blogspot.com/2017/04/how-to-develop-your-childs-imagination.html |
About UsHi Im Veronica. Im a mum of two. Living in the UK. I absolutely love dressing my kids up in stylish little outfits and showing them off around town. When I'm not running around town with my kids, I'm shopping or designing my flat or someone else's. Part time interior designer and self appointed home decor expert. ArchivesCategories |


 And finally, if all else fails, and you drank all of the wine helping with homework, before you gave it to your third grader to bring to school, a pretty flowers in a jar are always a hit.


 RSS Feed
